

android仿qq联系人界面上拉
时间: 2023-10-30 20:03:43
浏览: 63
Android仿QQ联系人界面上拉是指在联系人[列表](https://geek.csdn.net/educolumn/ba94496e6cfa8630df5d047358ad9719?dp_token=eyJ0eXAiOiJKV1QiLCJhbGciOiJIUzI1NiJ9.eyJpZCI6NDQ0MDg2MiwiZXhwIjoxNzA3MzcxOTM4LCJpYXQiOjE3MDY3NjcxMzgsInVzZXJuYW1lIjoid2VpeGluXzY4NjQ1NjQ1In0.RrTYEnMNYPC7AQdoij4SBb0kKEgHoyvF-bZOG2eGQvc&spm=1055.2569.3001.10083)中,当用户向上滑动[列表](https://geek.csdn.net/educolumn/ba94496e6cfa8630df5d047358ad9719?dp_token=eyJ0eXAiOiJKV1QiLCJhbGciOiJIUzI1NiJ9.eyJpZCI6NDQ0MDg2MiwiZXhwIjoxNzA3MzcxOTM4LCJpYXQiOjE3MDY3NjcxMzgsInVzZXJuYW1lIjoid2VpeGluXzY4NjQ1NjQ1In0.RrTYEnMNYPC7AQdoij4SBb0kKEgHoyvF-bZOG2eGQvc&spm=1055.2569.3001.10083)时,[列表](https://geek.csdn.net/educolumn/ba94496e6cfa8630df5d047358ad9719?dp_token=eyJ0eXAiOiJKV1QiLCJhbGciOiJIUzI1NiJ9.eyJpZCI6NDQ0MDg2MiwiZXhwIjoxNzA3MzcxOTM4LCJpYXQiOjE3MDY3NjcxMzgsInVzZXJuYW1lIjoid2VpeGluXzY4NjQ1NjQ1In0.RrTYEnMNYPC7AQdoij4SBb0kKEgHoyvF-bZOG2eGQvc&spm=1055.2569.3001.10083)会有一个反弹效果,即向下拉出一部分[列表](https://geek.csdn.net/educolumn/ba94496e6cfa8630df5d047358ad9719?dp_token=eyJ0eXAiOiJKV1QiLCJhbGciOiJIUzI1NiJ9.eyJpZCI6NDQ0MDg2MiwiZXhwIjoxNzA3MzcxOTM4LCJpYXQiOjE3MDY3NjcxMzgsInVzZXJuYW1lIjoid2VpeGluXzY4NjQ1NjQ1In0.RrTYEnMNYPC7AQdoij4SBb0kKEgHoyvF-bZOG2eGQvc&spm=1055.2569.3001.10083)内容。这样的设计可以增加用户操作的趣味性和可视性。
在实现上拉效果时,可以通过监听[列表](https://geek.csdn.net/educolumn/ba94496e6cfa8630df5d047358ad9719?dp_token=eyJ0eXAiOiJKV1QiLCJhbGciOiJIUzI1NiJ9.eyJpZCI6NDQ0MDg2MiwiZXhwIjoxNzA3MzcxOTM4LCJpYXQiOjE3MDY3NjcxMzgsInVzZXJuYW1lIjoid2VpeGluXzY4NjQ1NjQ1In0.RrTYEnMNYPC7AQdoij4SBb0kKEgHoyvF-bZOG2eGQvc&spm=1055.2569.3001.10083)的滚动状态,当用户滑动到顶部且继续向上滑动时,可以通过改变列表的布局参数来实现上拉效果。在滑动过程中,可以根据滑动距离来改变列表的显示位置,使其向下拉出一部分列表内容。同时,可以添加阻尼效果,即在用户松手后,列表会有一个减速的反弹效果,使得上拉效果更加真实。
为了实现上拉效果,可以使用辅助库如RecyclerView等,通过设置滑动监听器,根据滑动的距离和方向来改变列表的布局参数,实现上拉效果的效果。同时,可以根据不同的上拉动作,如快速上拉和慢速上拉,来调整上拉效果的速度和反弹的力度,从而提高用户体验。
值得注意的是,在实现上拉效果时,需要考虑性能和用户体验。为了避免滑动时卡顿和过度消耗资源,可以采用合适的算法和优化措施,如使用异步加载数据、对列表项进行缓存等。同时,要根据实际情况合理设置上拉的触发条件,使得用户可以轻松实现上拉操作,同时不影响其他列表的功能和交互。
相关问题
Android仿QQ音乐播放界面代码
以下是一个简单的Android仿QQ音乐播放界面的代码示例:
1. 首先,在布局文件中添加以下代码:
```xml
<RelativeLayout xmlns:android="http://schemas.android.com/apk/res/android"
android:layout_width="match_parent"
android:layout_height="match_parent">
<ImageView
android:id="@+id/imageViewAlbumArt"
android:layout_width="200dp"
android:layout_height="200dp"
android:layout_centerInParent="true"
android:src="@drawable/album_art_placeholder" />
<TextView
android:id="@+id/textViewSongTitle"
android:layout_width="wrap_content"
android:layout_height="wrap_content"
android:layout_below="@id/imageViewAlbumArt"
android:layout_centerHorizontal="true"
android:text="Song Title"
android:textColor="@android:color/black"
android:textSize="20sp" />
<TextView
android:id="@+id/textViewArtistAlbum"
android:layout_width="wrap_content"
android:layout_height="wrap_content"
android:layout_below="@id/textViewSongTitle"
android:layout_centerHorizontal="true"
android:text="Artist - Album"
android:textColor="@android:color/darker_gray"
android:textSize="16sp" />
<SeekBar
android:id="@+id/seekBar"
android:layout_width="match_parent"
android:layout_height="wrap_content"
android:layout_below="@id/textViewArtistAlbum"
android:layout_marginTop="20dp"
android:max="100"
android:paddingLeft="20dp"
android:paddingRight="20dp"
android:progress="0"
android:thumb="@drawable/seekbar_thumb" />
<TextView
android:id="@+id/textViewCurrentTime"
android:layout_width="wrap_content"
android:layout_height="wrap_content"
android:layout_below="@id/seekBar"
android:layout_marginTop="10dp"
android:layout_marginLeft="20dp"
android:text="00:00"
android:textColor="@android:color/darker_gray"
android:textSize="14sp" />
<TextView
android:id="@+id/textViewDuration"
android:layout_width="wrap_content"
android:layout_height="wrap_content"
android:layout_below="@id/seekBar"
android:layout_alignParentRight="true"
android:layout_marginTop="10dp"
android:layout_marginRight="20dp"
android:text="00:00"
android:textColor="@android:color/darker_gray"
android:textSize="14sp" />
<LinearLayout
android:id="@+id/linearLayoutPlayerControls"
android:layout_width="match_parent"
android:layout_height="wrap_content"
android:layout_below="@id/textViewCurrentTime"
android:layout_marginTop="10dp"
android:gravity="center">
<ImageButton
android:id="@+id/imageButtonPrevious"
android:layout_width="wrap_content"
android:layout_height="wrap_content"
android:background="@android:color/transparent"
android:padding="10dp"
android:src="@drawable/ic_skip_previous_black_24dp" />
<ImageButton
android:id="@+id/imageButtonPlayPause"
android:layout_width="wrap_content"
android:layout_height="wrap_content"
android:background="@android:color/transparent"
android:padding="10dp"
android:src="@drawable/ic_play_arrow_black_24dp" />
<ImageButton
android:id="@+id/imageButtonNext"
android:layout_width="wrap_content"
android:layout_height="wrap_content"
android:background="@android:color/transparent"
android:padding="10dp"
android:src="@drawable/ic_skip_next_black_24dp" />
</LinearLayout>
</RelativeLayout>
```
android studio仿qq界面
以下是使用Android Studio制作仿QQ界面的步骤:
1. 创建一个新的Android项目,并命名为"QQDemo"。
2. 在项目的res文件夹中创建一个新的drawable文件夹,并将qq_logo图片放入其中。
3. 在项目的布局文件中添加一个ImageView来显示qq_logo图片。在activity_main.xml文件中添加以下代码:
```xml
<ImageView
android:id="@+id/logo"
android:layout_width="150dp"
android:layout_height="150dp"
android:layout_marginTop="80dp"
android:layout_centerHorizontal="true"
android:src="@drawable/qq_logo" />
```
相关推荐
最新推荐
Android仿QQ空间动态界面分享功能
在Android应用开发中,仿QQ空间动态界面分享功能是一个常见的需求,这涉及到多个技术点,包括数据获取与处理、UI设计、用户交互以及性能优化。本文将深入探讨这些关键知识点。 首先,动态列表界面...
Android仿QQ、微信聊天界面长按提示框效果
最近在工作项目中要实现一个长按提示 “复制” 的功能,类似于QQ、微信聊天界面长按提示框效果,本来想偷懒在网上找个开源的项目用,但是看了好几个都不是很满意,所以就打算按照自己的思路来实现一个。下面分享给...
Android Studio实现简单的QQ登录界面的示例代码
Android Studio实现简单的QQ登录界面的示例代码 Android Studio作为一款功能强大且广泛使用的集成开发环境(IDE),它提供了许多强大的功能和工具来帮助开发者快速构建高质量的Android应用程序。今天,我们将通过...
仿制android QQ说明
本文档仅有仿制android QQ说明 app在另一个资源 服务器在其他资源 资源下载
js仿腾讯QQ的web登陆界面
用了腾讯QQ也有将近十年了,今天心血来潮想模仿腾讯QQ的登陆面板做一个web版的登陆面板,然后参考了一些代码,自己模仿,学写了一个。 效果如下: 其中还实现了拖动面板,选择状态的效果 下面是具体代码: 1....
图书馆管理系统数据库设计与功能详解
"图书馆管理系统数据库设计.pdf"
图书馆管理系统数据库设计是一项至关重要的任务,它涉及到图书信息、读者信息、图书流通等多个方面。在这个系统中,数据库的设计需要满足各种功能需求,以确保图书馆的日常运营顺畅。
首先,系统的核心是安全性管理。为了保护数据的安全,系统需要设立权限控制,允许管理员通过用户名和密码登录。管理员具有全面的操作权限,包括添加、删除、查询和修改图书信息、读者信息,处理图书的借出、归还、逾期还书和图书注销等事务。而普通读者则只能进行查询操作,查看个人信息和图书信息,但不能进行修改。
读者信息管理模块是另一个关键部分,它包括读者类型设定和读者档案管理。读者类型设定允许管理员定义不同类型的读者,比如学生、教师,设定他们可借阅的册数和续借次数。读者档案管理则存储读者的基本信息,如编号、姓名、性别、联系方式、注册日期、有效期限、违规次数和当前借阅图书的数量。此外,系统还包括了借书证的挂失与恢复功能,以防止丢失后图书的不当借用。
图书管理模块则涉及图书的整个生命周期,从基本信息设置、档案管理到征订、注销和盘点。图书基本信息设置包括了ISBN、书名、版次、类型、作者、出版社、价格、现存量和库存总量等详细信息。图书档案管理记录图书的入库时间,而图书征订用于订购新的图书,需要输入征订编号、ISBN、订购数量和日期。图书注销功能处理不再流通的图书,这些图书的信息会被更新,不再可供借阅。图书查看功能允许用户快速查找特定图书的状态,而图书盘点则是为了定期核对库存,确保数据准确。
图书流通管理模块是系统中最活跃的部分,它处理图书的借出和归还流程,包括借阅、续借、逾期处理等功能。这个模块确保了图书的流通有序,同时通过记录借阅历史,方便读者查询自己的借阅情况和超期还书警告。
图书馆管理系统数据库设计是一个综合性的项目,涵盖了用户认证、信息管理、图书操作和流通跟踪等多个层面,旨在提供高效、安全的图书服务。设计时需要考虑到系统的扩展性、数据的一致性和安全性,以满足不同图书馆的具体需求。
管理建模和仿真的文件
管理Boualem Benatallah引用此版本:布阿利姆·贝纳塔拉。管理建模和仿真。约瑟夫-傅立叶大学-格勒诺布尔第一大学,1996年。法语。NNT:电话:00345357HAL ID:电话:00345357https://theses.hal.science/tel-003453572008年12月9日提交HAL是一个多学科的开放存取档案馆,用于存放和传播科学研究论文,无论它们是否被公开。论文可以来自法国或国外的教学和研究机构,也可以来自公共或私人研究中心。L’archive ouverte pluridisciplinaire
表锁问题全解析:深度解读,轻松解决
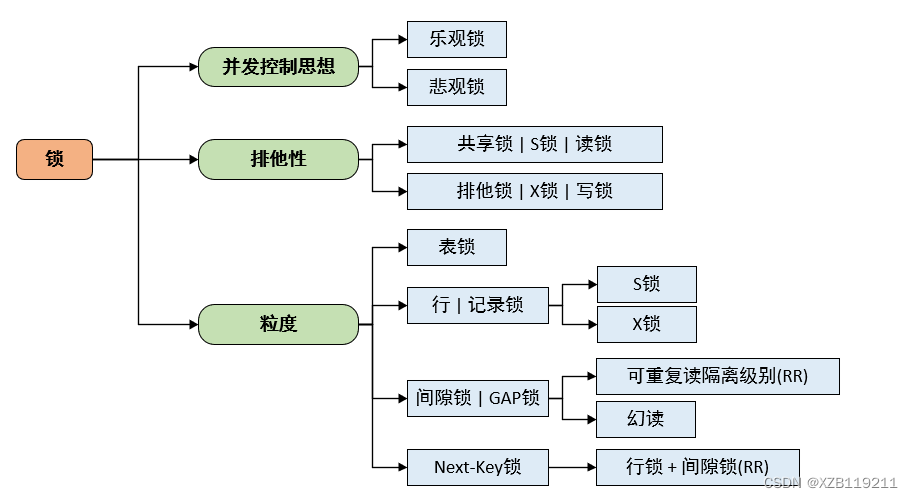
# 1. 表锁基础**
表锁是一种数据库并发控制机制,用于防止多个事务同时修改同一行或表,从而保证数据的一致性和完整性。表锁的工作原理是通过在表或行上设置锁,当一个事务需要访问被锁定的数据时,它必须等待锁被释放。
表锁分为两种类型:行锁和表锁。行锁只锁定被访问的行,而表锁锁定整个表。行锁的粒度更细,可以提高并发性,但开销也更大。表锁的粒度更粗,开销较小,但并发性较低。
表锁还分为共享锁和排他锁。共享锁允许多个事务同时
麻雀搜索算法SSA优化卷积神经网络CNN
麻雀搜索算法(Sparrow Search Algorithm, SSA)是一种生物启发式的优化算法,它模拟了麻雀觅食的行为,用于解决复杂的优化问题,包括在深度学习中调整神经网络参数以提高性能。在卷积神经网络(Convolutional Neural Networks, CNN)中,SSA作为一种全局优化方法,可以应用于网络架构搜索、超参数调优等领域。
在CNN的优化中,SSA通常会:
1. **构建种群**:初始化一组随机的CNN结构或参数作为“麻雀”个体。
2. **评估适应度**:根据每个网络在特定数据集上的性能(如验证集上的精度或损失)来评估其适应度。
3. **觅食行为**:模仿
***物流有限公司仓储配送业务SOP详解
"该文档是***物流有限公司的仓储配送业务SOP管理程序,包含了工作职责、操作流程、各个流程的详细步骤,旨在规范公司的仓储配送管理工作,提高效率和准确性。"
在物流行业中,标准操作程序(SOP)是确保业务流程高效、一致和合规的关键。以下是对文件中涉及的主要知识点的详细解释:
1. **工作职责**:明确各岗位人员的工作职责和责任范围,是确保业务流程顺畅的基础。例如,配送中心主管负责日常业务管理、费用控制、流程监督和改进;发运管理员处理运输调配、计划制定、5S管理;仓管员负责货物的收发存管理、质量控制和5S执行;客户服务员则处理客户指令、运营单据和物流数据管理。
2. **操作流程**:文件详细列出了各项操作流程,包括**入库及出库配送流程**,强调了从接收到发货的完整过程,包括验收、登记、存储、拣选、包装、出库等环节,确保货物的安全和准确性。
3. **仓库装卸作业流程**:详细规定了货物装卸的操作步骤,包括使用设备、安全措施、作业标准,以防止货物损坏并提高作业效率。
4. **货物在途跟踪及异常情况处理流程**:描述了如何监控货物在运输途中的状态,以及遇到异常如延误、丢失或损坏时的应对措施,确保货物安全并及时处理问题。
5. **单据流转及保管流程**:规定了从订单创建到完成的单据处理流程,包括记录、审核、传递和存档,以保持信息的准确性和可追溯性。
6. **存货管理**:涵盖了库存控制策略,如先进先出(FIFO)、定期盘点、库存水平的优化,以避免过度库存或缺货。
7. **仓库标志流程**:明确了仓库内的标识系统,帮助员工快速定位货物,提高作业效率。
8. **仓库5S管理及巡检流程**:5S(整理、整顿、清扫、清洁、素养)是提高仓库环境和工作效率的重要工具,巡检流程则确保了5S的持续实施。
9. **仓库建筑设备设施的维护流程**:强调了设备设施的定期检查、保养和维修,以保证其正常运行,避免因设备故障导致的运营中断。
10. **附件清单**:列出所有相关的附件和表格,便于员工参考和执行。