《第一行代码》第2版思维导图及所有学习笔记目录
Circleimageview项目主页地址
准备滑动菜单页面布局:
1
2
3
4
5
6
7
8
9
10
11
12
13
14
15
16
17
18
19
20
21
22
23
24
25
26
27
28
29
30
31
32
33
34
35
36
37
38
39
40
41
42
43
44
45
46
47
48
49
50
51
52
53
54
55
56
57
58
59
60
|
# menu
<?xml version="1.0" encoding="utf-8"?>
<menu xmlns:android="http://schemas.android.com/apk/res/android">
<group android:checkableBehavior="single"> //指定这一组菜单项单选
<item
android:id="@+id/nav_call"
android:icon="@drawable/nav_call"
android:title="Call"/>
<item
android:id="@+id/nav_friends"
android:icon="@drawable/nav_friends"
android:title="Friends"/>
<item
android:id="@+id/nav_location"
android:icon="@drawable/nav_location"
android:title="Location"/>
<item
android:id="@+id/nav_mail"
android:icon="@drawable/nav_mail"
android:title="Mail"/>
<item
android:id="@+id/nav_task"
android:icon="@drawable/nav_task"
android:title="Tasks"/>
</group>
</menu>
# headerLayout
<?xml version="1.0" encoding="utf-8"?>
<RelativeLayout xmlns:android="http://schemas.android.com/apk/res/android"
android:layout_width="match_parent"
android:layout_height="180dp"
android:padding="10dp"
android:background="?attr/colorPrimary">
<de.hdodenhof.circleimageview.CircleImageView
android:id="@+id/icon_image"
android:layout_width="70dp"
android:layout_height="70dp"
android:src="@drawable/nav_icon"
android:layout_centerInParent="true"/>
<TextView
android:id="@+id/mail"
android:layout_width="wrap_content"
android:layout_height="wrap_content"
android:layout_alignParentBottom="true"
android:text="[email protected]"
android:textColor="#FFF"
android:textSize="14sp"/>
<TextView
android:id="@+id/usr_name"
android:layout_width="wrap_content"
android:layout_height="wrap_content"
android:layout_above="@+id/mail"
android:text="Andy Lee"
android:textColor="#fff"
android:textSize="14sp"/>
</RelativeLayout>
|
引入滑动菜单页面布局:
1
2
3
4
5
6
7
8
9
|
# 将前面的TextView换为NavigationView
<android.support.design.widget.NavigationView
android:id="@+id/nav_view"
android:layout_width="match_parent"
android:layout_height="match_parent"
android:layout_gravity="start"
app:menu="@menu/nav_menu" // 引入menu
app:headerLayout="@layout/nav_header" // 引入headerLayout
/>
|
加入响应代码:
1
2
3
4
5
6
7
8
9
|
NavigationView navView = (NavigationView) findViewById(R.id.nav_view);
navView.setNavigationItemSelectedListener(new NavigationView.OnNavigationItemSelectedListener() {
@Override
public boolean onNavigationItemSelected(@NonNull MenuItem item) {
return false;
}
|
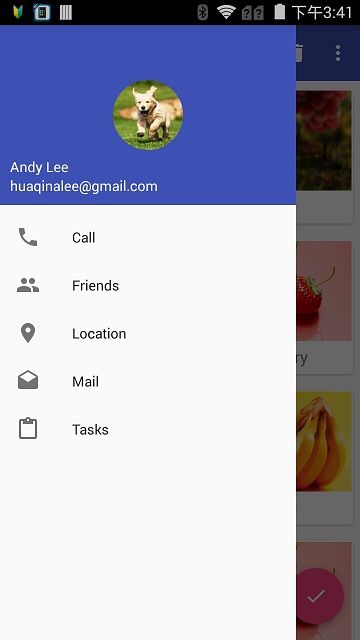
效果如下:

1
2
3
4
5
6
7
8
9
|
<android.support.v7.widget.CardView
android:layout_width="match_parent"
android:layout_height="wrap_content"
android:cardCornerRadius="4dp" // 圆角弧度
app:elevation="5dp"/>// 投影高度
<TextView .../>
</android.support.v7.widget.CardView>
|
Glide项目主页地址
引入RecyclerView布局:
1
2
3
4
5
6
7
8
9
10
|
<android.support.design.widget.CoordinatorLayout
<android.support.v7.widget.Toolbar
..../>
<android.support.v7.widget.RecyclerView
android:id="@+id/recycler_view"
android:layout_width="match_parent"
android:layout_height="match_parent"/>
...
</android.support.design.widget.CoordinatorLayout>
|
这样子RecyclerView会将Toolbar给遮住,因为CoordinatorLayout(类似FrameLayout)布局默认置于左上角,后面通过APPBarLayout解决此问题
定义一个Fruit实体类(只有name和imageId两个字段)。接下来需要为RecyclerView的子项指定自定义布局fruit_item.xml。
引入CardView布局:
1
2
3
4
5
6
7
8
9
10
11
12
13
14
15
16
17
18
19
20
21
22
23
|
<?xml version="1.0" encoding="utf-8"?>
<android.support.v7.widget.CardView xmlns:android="http://schemas.android.com/apk/res/android"
xmlns:app="http://schemas.android.com/apk/res-auto"
android:layout_width="match_parent"
android:layout_height="wrap_content"
android:layout_margin="5dp"
app:cardCornerRadius="4dp">
<LinearLayout
android:layout_width="match_parent"
android:layout_height="wrap_content"
android:orientation="vertical">
<ImageView
android:id="@+id/fruit_image"
android:scaleType="centerCrop" //指定图片缩放方式
.../>
<TextView
android:id="@+id/fruit_name"
.../>
</LinearLayout>
</android.support.v7.widget.CardView>
|
添加RecyclerView适配器FruitAdapter,如下:
1
2
3
4
5
6
7
8
9
10
11
12
13
14
15
16
17
18
19
20
21
22
23
24
25
26
27
28
29
30
31
32
33
34
35
36
37
38
39
40
41
42
|
public class FruitAdapter extends RecyclerView.Adapter<FruitAdapter.ViewHolder> {
private Context mContext;
private List<Fruit> mLists;
public FruitAdapter(List<Fruit> lists) {
mLists = lists;
}
@Override
public FruitAdapter.ViewHolder onCreateViewHolder(ViewGroup parent, int viewType) {
if (mContext == null) {
mContext = parent.getContext();
}
View view = LayoutInflater.from(mContext).inflate(R.layout.fruit_item, parent, false);
return viewHolder(view);
}
@Override
public void onBindViewHolder(FruitAdapter.ViewHolder holder, int position) {
Fruit fruit = mLists.get(position);
holder.fruitName.setText(fruit.getName());
Glide.with(mContext).load(fruit.getImageId()).into(holder.fruitImage);
}
@Override
public int getItemCount() {
return mLists.size();
}
static class ViewHolder extends RecyclerView.ViewHolder {
CardView cardView;
ImageView fruitImage;
TextView fruitName;
public ViewHolder(View itemView) {
super(itemView);
cardView = (CardView) itemView;
fruitImage = (ImageView) itemView.findViewById(R.id.fruit_image);
fruitName = (TextView) itemView.findViewById(R.id.fruit_name);
}
}
}
|
添加加载RecyclerView代码:
1
2
3
4
5
6
|
...
RecyclerView recyclerView = (RecyclerView) findViewById(...);
GridLayoutManager layoutManager = new GridLayoutManager(this, 2);
recyclerView.setLayoutManager(layoutManager);
adapter = new FruitAdapter(fruitList);
recyclerView.setAdapter(adapter);
|
Material Design示例源码
。
