|
setupPoolingDataSource
Configures a data source.
getDs
Returns the configured data source.
getEmf
Returns the configured EntityManagerFactory.
getTestWorkItemHandler
Returns a test work item handler that can be registered in addition to the default work item handler.
clearHistory
Clears the history log.
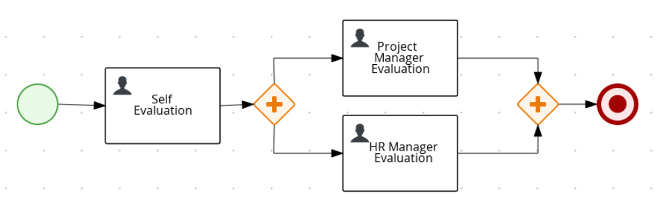
The following example contains a start event, a script task, and an end event. The example JUnit test creates a new session, starts the hello.bpmn process, and verifies whether the process instance is completed and the StartProcess, Hello, and EndProcess nodes are executed.
public class ProcessPersistenceTest extends JbpmJUnitBaseTestCase {
public ProcessPersistenceTest() {
super(true, true);
@Test
public void testProcess() {
createRuntimeManager("hello.bpmn");
RuntimeEngine runtimeEngine = getRuntimeEngine();
KieSession ksession = runtimeEngine.getKieSession();
ProcessInstance processInstance = ksession.startProcess("com.sample.bpmn.hello");
assertProcessInstanceNotActive(processInstance.getId(), ksession);
assertNodeTriggered(processInstance.getId(), "StartProcess", "Hello", "EndProcess");
JbpmJUnitBaseTestCase supports all predefined RuntimeManager strategies as part of the unit testing. Therefore, it is enough to specify the strategy that is used when you create a RuntimeManager as part of a single test. The following example shows the use of the PerProcessInstance strategy in a task service to manage user tasks:
public class ProcessHumanTaskTest extends JbpmJUnitBaseTestCase {
private static final Logger logger = LoggerFactory.getLogger(ProcessHumanTaskTest.class);
public ProcessHumanTaskTest() {
super(true, false);
@Test
public void testProcessProcessInstanceStrategy() {
RuntimeManager manager = createRuntimeManager(Strategy.PROCESS_INSTANCE, "manager", "humantask.bpmn");
RuntimeEngine runtimeEngine = getRuntimeEngine(ProcessInstanceIdContext.get());
KieSession ksession = runtimeEngine.getKieSession();
TaskService taskService = runtimeEngine.getTaskService();
int ksessionID = ksession.getId();
ProcessInstance processInstance = ksession.startProcess("com.sample.bpmn.hello");
assertProcessInstanceActive(processInstance.getId(), ksession);
assertNodeTriggered(processInstance.getId(), "Start", "Task 1");
manager.disposeRuntimeEngine(runtimeEngine);
runtimeEngine = getRuntimeEngine(ProcessInstanceIdContext.get(processInstance.getId()));
ksession = runtimeEngine.getKieSession();
taskService = runtimeEngine.getTaskService();
assertEquals(ksessionID, ksession.getId());
// let John execute Task 1
List<TaskSummary> list = taskService.getTasksAssignedAsPotentialOwner("john", "en-UK");
TaskSummary task = list.get(0);
logger.info("John is executing task {}", task.getName());
taskService.start(task.getId(), "john");
taskService.complete(task.getId(), "john", null);
assertNodeTriggered(processInstance.getId(), "Task 2");
// let Mary execute Task 2
list = taskService.getTasksAssignedAsPotentialOwner("mary", "en-UK");
task = list.get(0);
logger.info("Mary is executing task {}", task.getName());
taskService.start(task.getId(), "mary");
taskService.complete(task.getId(), "mary", null);
assertNodeTriggered(processInstance.getId(), "End");
assertProcessInstanceNotActive(processInstance.getId(), ksession);
}12.1. Testing integration with external services
Business processes often include the invocation of external services. Unit testing of a business process enables you to register test handlers that verify whether the specific services are requested correctly, and also provide test responses for the requested services.
To test the interaction with external services, use the default TestWorkItemHandler handler. You can register the TestWorkItemHandler to collect all the work items of a particular type. Also, TestWorkItemHandler contains data related to a task. A work item represents one unit of work, such as sending a specific email or invoking a specific service. The TestWorkItemHandler verifies whether a specific work item is requested during an execution of a process, and the associated data is correct.
The following example shows how to verify an email task and whether an exception is raised if the email is not sent. The unit test uses a test handler that is executed when an email is requested and enables you to test the data related to the email, such as the sender and recipient. Once the abortWorkItem() method notifies the engine about the email delivery failure, the unit test verifies that the process handles such case by generating an error and logging the action. In this case, the process instance is eventually aborted.
public void testProcess2() {
createRuntimeManager("sample-process.bpmn");
RuntimeEngine runtimeEngine = getRuntimeEngine();
KieSession ksession = runtimeEngine.getKieSession();
TestWorkItemHandler testHandler = getTestWorkItemHandler();
ksession.getWorkItemManager().registerWorkItemHandler("Email", testHandler);
ProcessInstance processInstance = ksession.startProcess("com.sample.bpmn.hello2");
assertProcessInstanceActive(processInstance.getId(), ksession);
assertNodeTriggered(processInstance.getId(), "StartProcess", "Email");
WorkItem workItem = testHandler.getWorkItem();
assertNotNull(workItem);
assertEquals("Email", workItem.getName());
assertEquals("[email protected]", workItem.getParameter("From"));
assertEquals("[email protected]", workItem.getParameter("To"));
ksession.getWorkItemManager().abortWorkItem(workItem.getId());
assertProcessInstanceNotActive(processInstance.getId(), ksession);
assertNodeTriggered(processInstance.getId(), "Gateway", "Failed", "Error");
}Chapter 13. Managing log files
Red Hat Process Automation Manager manages the required maintenance, runtime data that is removed, including:
Process instance data, which is removed upon process instance completion.
Work item data, which is removed upon work item completion.
Task instance data, which is removed upon completion of a process to which the given task belongs.
Runtime data, which is not cleaned automatically includes session information data that is based on the selected runtime strategy.
Singleton strategy ensures that runtime data of session information is not automatically removed.
Per request strategy allows automatic removal when a request is terminated.
Per process instances are automatically removed when a process instance is mapped to a session that is completed or aborted.
In order to keep the track of process instances, Red Hat Process Automation Manager provides audit data tables. There are two ways to manage and maintain the audit data tables, including cleaning up the jobs automatically and manually.
13.1. Setting up automatic cleanup job
You can set up an automatic cleanup job in Business Central.
Procedure -
In Business Central, go to Manage > Jobs.
Click New Job.
Enter values for Business Key, Due On, and Retries fields.
Enter the following command into the Type field.
org.jbpm.executor.commands.LogCleanupCommand
To use the parameters, complete the following steps:
For full parameters list, see Section 13.3, “Removing logs from the database”.
Open the Advanced tab.
Click Add Parameter.
Enter a parameter in the Key column and enter a parameter value in the Value column.
Click Create.
The automatic cleanup job is created.
To perform manual cleanup, you can use the audit API. The audit API is divided into the following areas:
Table 13.1. Audit API areas| Name | Description |
|---|
|
Process audit
It is used to clean up process, node and variable logs that are accessible in the jbpm-audit module.
For example, you can access the module as follows: org.jbpm.process.audit.JPAAuditLogService
Task audit
It is used to clean up tasks and events that are accessible in the jbpm-human-task-audit module.
For example, you can access the module as follows: org.jbpm.services.task.audit.service.TaskJPAAuditService
Executor jobs
It is used to clean up executor jobs and errors that are accessible in the jbpm-executor module.
For example, you can access the module as follows: org.jbpm.executor.impl.jpa.ExecutorJPAAuditService
| 13.3. Removing logs from the database
Use LogCleanupCommand executor command to clean up the data, which is using the database space. The LogCleanupCommand consists of logic to automatically clean up all or selected data.
There are several configuration options that you can use with the LogCleanupCommand:
Table 13.2. LogCleanupCommand parameters table| Name | Description | Is Exclusive |
|---|
|
SkipProcessLog
Indicates whether process and node instances, and process variables log cleanup is skipped when the command runs. The default value is false.
No, it is used with other parameters.
SkipTaskLog
Indicates if the task audit and event log cleanup are skipped. The default value is false.
No, it is used with other parameters.
SkipExecutorLog
Indicates if Red Hat Process Automation Manager executor entries cleanup is skipped. The default value is false.
No, it is used with other parameters.
SingleRun
Indicates if a job routine runs only once. The default value is false.
No, it is used with other parameters.
NextRun
Schedules the next job execution. The default value is 24h.
For example, set to 12h for jobs to be executed every 12 hours. The schedule is ignored if you set SingleRun to true, unless you set both SingleRun and NextRun. If both are set, the NextRun schedule takes priority. The ISO format can be used to set the precise date.
No, it is used with other parameters.
OlderThan
Logs that are older than the specified date are removed. The date format is YYYY-MM-DD. Usually, this parameter is used for single run jobs.
Yes, it is not used with OlderThanPeriod parameter.
OlderThanPeriod
Logs that are older than the specified timer expression are removed. For example, set 30d to remove logs, which are older than 30 days.
Yes, it is not used with OlderThan parameter.
ForProcess
Specifies process definition ID for logs that are removed.
No, it is used with other parameters.
RecordsPerTransaction
Indicates the number of records in a transaction that is removed. The default value is 0, indicating all the records.
No, it is used with other parameters.
ForDeployment
Specifies deployment ID of the logs that are removed.
No, it is used with other parameters.
EmfName
Persistence unit name that is used to perform delete operation.
Not applicable
LogCleanupCommand does not remove any active instances, such as running process instances, task instances, or executor jobs.
Chapter 14. Process definitions and process instances in Business Central
A process definition is a Business Process Model and Notation (BPMN) 2.0 file that serves as a container for a process and its BPMN diagram. The process definition shows all of the available information about the business process, such as any associated sub-processes or the number of users and groups that are participating in the selected definition.
A process definition also defines the import entry for imported processes that the process definition uses, and the relationship entries.
BPMN2 source of a process definition
<definitions id="Definition"
targetNamespace="http://www.jboss.org/drools"
typeLanguage="http://www.java.com/javaTypes"
expressionLanguage="http://www.mvel.org/2.0"
xmlns="http://www.omg.org/spec/BPMN/20100524/MODEL"Rule Task
xmlns:xsi="http://www.w3.org/2001/XMLSchema-instance"
xsi:schemaLocation="http://www.omg.org/spec/BPMN/20100524/MODEL BPMN20.xsd"
xmlns:g="http://www.jboss.org/drools/flow/gpd"
xmlns:bpmndi="http://www.omg.org/spec/BPMN/20100524/DI"
xmlns:dc="http://www.omg.org/spec/DD/20100524/DC"
xmlns:di="http://www.omg.org/spec/DD/20100524/DI"
xmlns:tns="http://www.jboss.org/drools">
<process>
PROCESS
</process>
<bpmndi:BPMNDiagram>
BPMN DIAGRAM DEFINITION
</bpmndi:BPMNDiagram>
</definitions>
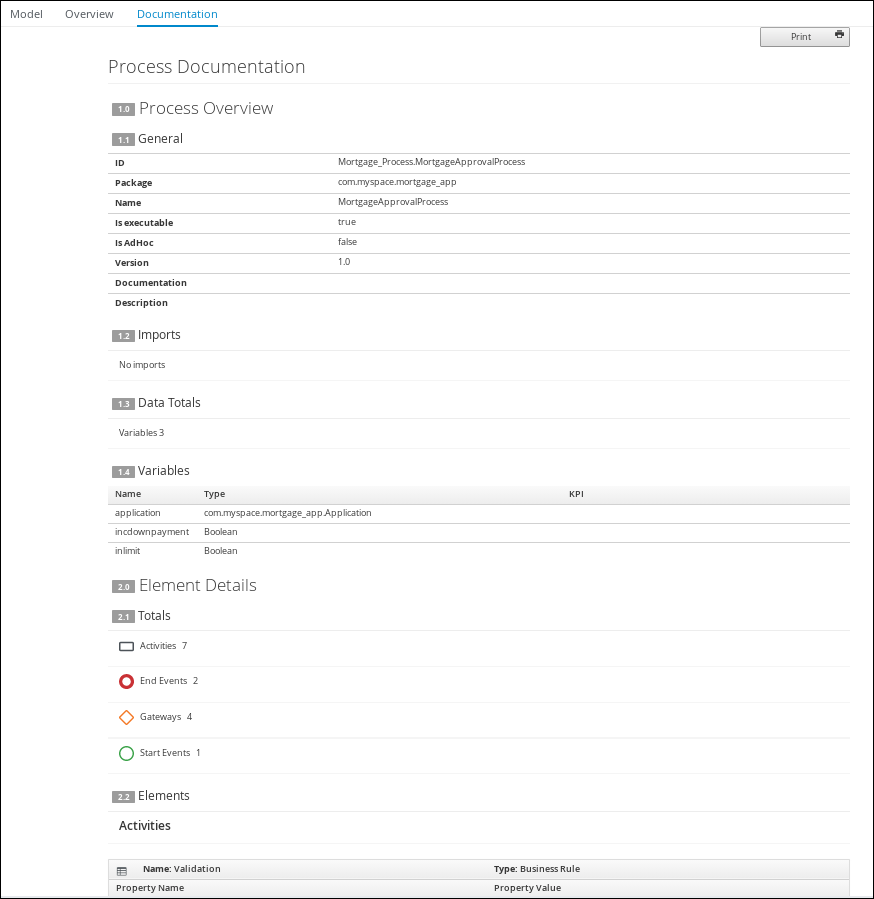
After you have created, configured, and deployed your project that includes your business processes, you can view the list of all the process definitions in Business Central Menu → Manage → Process Definitions. You can refresh the list of deployed process definitions at any time by clicking the refresh button in the upper-right corner.
The process definition list shows all the available process definitions that are deployed into the platform. Click any of the process definitions listed to show the corresponding process definition details. This displays information about the process definition, such as if there is a sub-process associated with it, or how many users and groups exist in the process definition. The Diagram tab in the process definition details page contains the BPMN2-based diagram of the process definition.
Within each selected process definition, you can start a new process instance for the process definition by clicking the New Process Instance button in the upper-right corner. Process instances that you start from the available process definitions are listed in Menu → Manage → Process Instances.
You can also define the default pagination option for all users under the Manage drop-down menu ( Process Definition, Process Instances, Tasks, Jobs, and Execution Errors) and in Menu → Track → Task Inbox.
For more information about process and task administration in Business Central, see Managing and monitoring business processes in Business Central.
14.1. Starting a process instance from the process definitions page
You can start a process instance in Menu → Manage → Process Definitions. This is useful for environments where you are working with several projects or process definitions at the same time.
Prerequisites -
A project with a process definition has been deployed in Business Central.
Procedure -
In Business Central, go to Menu → Manage → Process Definitions.
Select the process definition for which you want to start a new process instance from the list. The details page of the definition opens.
Click New Process Instance in the upper-right corner to start a new process instance.
Provide any required information for the process instance.
Click Submit to create the process instance.
View the new process instance in Menu → Manage → Process Instances.
14.2. Starting a process instance from the process instances page
You can create new process instances or view the list of all the running process instances in Menu → Manage → Process Instances.
Prerequisites -
A project with a process definition has been deployed in Business Central.
Procedure -
In Business Central, go to Menu → Manage → Process Instances.
Click New Process Instance in the upper-right corner and select the process definition for which you want to start a new process instance from the drop-down list.
Provide any information required to start a new process instance.
Click Start to create the process instance.
The new process instance appears in the Manage Process Instances list.
14.3. Process definitions in XML
You can create processes directly in XML format using the BPMN 2.0 specifications. The syntax of these XML processes is defined using the BPMN 2.0 XML Schema Definition.
A process XML file consists of the following core sections:
process: This is the top part of the process XML that contains the definition of the different nodes and their properties. The process XML file consists of exactly one <process> element. This element contains parameters related to the process (its type, name, ID, and package name), and consists of three subsections: a header section where process-level information such as variables, globals, imports, and lanes are defined, a nodes section that defines each of the nodes in the process, and a connections section that contains the connections between all the nodes in the process.
BPMNDiagram: This is the lower part of the process XML file that contains all graphical information, such as the location of the nodes. The nodes section contains a specific element for each node and defines the various parameters and any sub-elements for that node type.
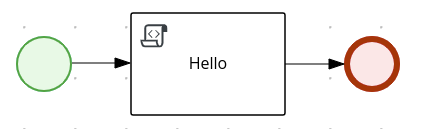
The following process XML file fragment shows a simple process that contains a sequence of a start event, a script task that prints "Hello World" to the console, and an end event:
<?xml version="1.0" encoding="UTF-8"?>
<definitions
id="Definition"
targetNamespace="http://www.jboss.org/drools"
typeLanguage="http://www.java.com/javaTypes"
expressionLanguage="http://www.mvel.org/2.0"
xmlns="http://www.omg.org/spec/BPMN/20100524/MODEL"
xmlns:xsi="http://www.w3.org/2001/XMLSchema-instance"
xsi:schemaLocation="http://www.omg.org/spec/BPMN/20100524/MODEL BPMN20.xsd"
xmlns:g="http://www.jboss.org/drools/flow/gpd"
xmlns:bpmndi="http://www.omg.org/spec/BPMN/20100524/DI"
xmlns:dc="http://www.omg.org/spec/DD/20100524/DC"
xmlns:di="http://www.omg.org/spec/DD/20100524/DI"
xmlns:tns="http://www.jboss.org/drools">
<process processType="Private" isExecutable="true" id="com.sample.hello" name="Hello Process">
<!-- nodes -->
<startEvent id="_1" name="Start" />
<scriptTask id="_2" name="Hello">
<script>System.out.println("Hello World");</script>
</scriptTask>
<endEvent id="_3" name="End" >
<terminateEventDefinition/>
</endEvent>
<!-- connections -->
<sequenceFlow id="_1-_2" sourceRef="_1" targetRef="_2" />
<sequenceFlow id="_2-_3" sourceRef="_2" targetRef="_3" />
</process>
<bpmndi:BPMNDiagram>
<bpmndi:BPMNPlane bpmnElement="com.sample.hello" >
<bpmndi:BPMNShape bpmnElement="_1" >
<dc:Bounds x="16" y="16" width="48" height="48" />
</bpmndi:BPMNShape>
<bpmndi:BPMNShape bpmnElement="_2" >
<dc:Bounds x="96" y="16" width="80" height="48" />
</bpmndi:BPMNShape>
<bpmndi:BPMNShape bpmnElement="_3" >
<dc:Bounds x="208" y="16" width="48" height="48" />
</bpmndi:BPMNShape>
<bpmndi:BPMNEdge bpmnElement="_1-_2" >
<di:waypoint x="40" y="40" />
<di:waypoint x="136" y="40" />
</bpmndi:BPMNEdge>
<bpmndi:BPMNEdge bpmnElement="_2-_3" >
<di:waypoint x="136" y="40" />
<di:waypoint x="232" y="40" />
</bpmndi:BPMNEdge>
</bpmndi:BPMNPlane>
</bpmndi:BPMNDiagram>
</definitions>Chapter 16. Advanced process concepts and tasks16.1. Invoking a Decision Model and Notation (DMN) service in a business process
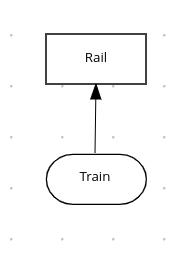
You can use Decision Model and Notation (DMN) to model a decision service graphically in a decision requirements diagram (DRD) in Business Central and then invoke that DMN service as part of a business process in Business Central. Business processes interact with DMN services by identifying the DMN service and mapping business data between DMN inputs and the business process properties.
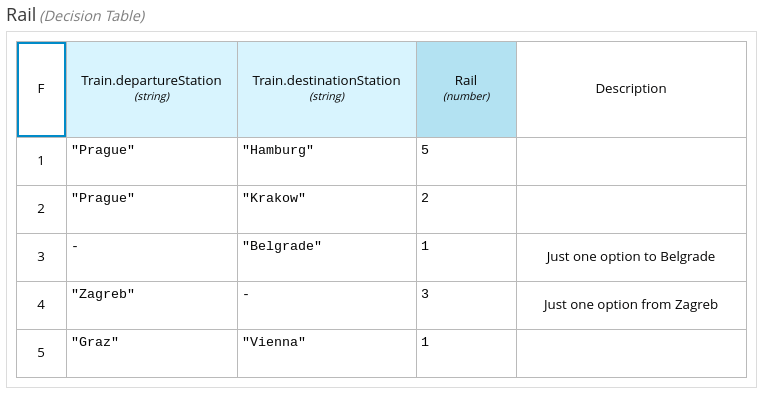
As an illustration, this procedure uses an example TrainStation project that defines train routing logic. This example project contains the following data object and DMN components designed in Business Central for the routing decision logic:
For more information about creating DMN models in Business Central, see Designing a decision service using DMN models.
Prerequisites -
All required data objects and DMN model components are defined in the project.
Procedure -
In Business Central, go to Menu → Design → Projects and click the project name.
Select or create the business process asset in which you want to invoke the DMN service.
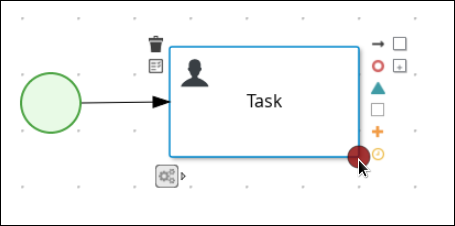
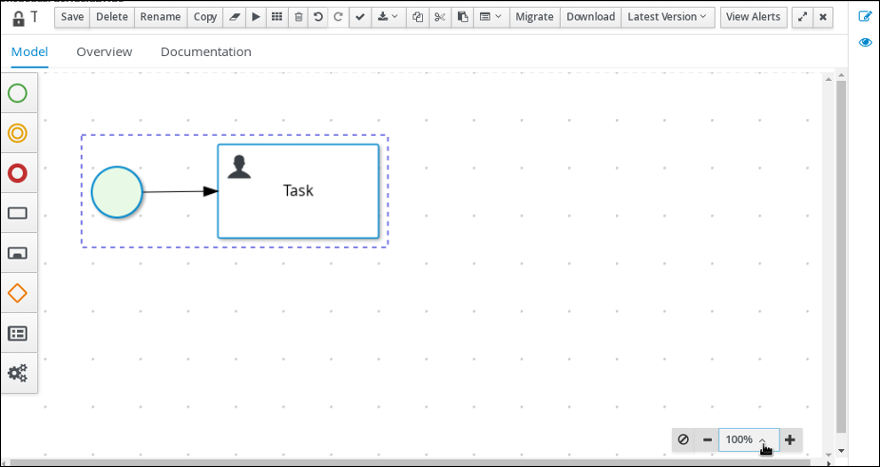
In the process designer, use the left toolbar to drag and drop BPMN components as usual to define your overall business process logic, connections, events, tasks, or other elements.
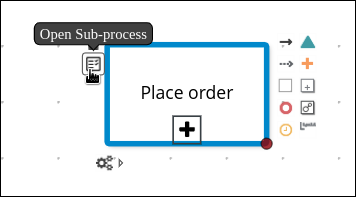
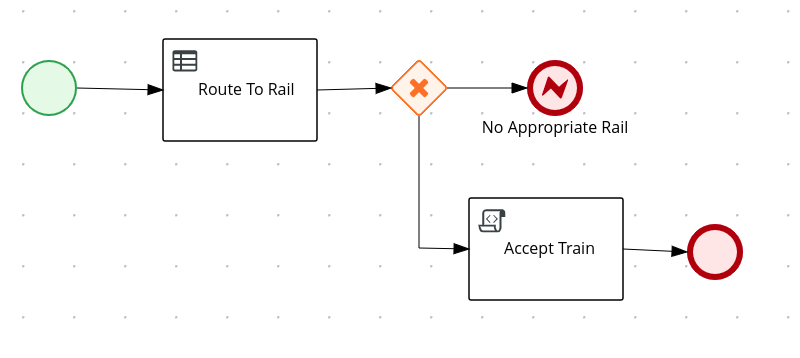
To incorporate a DMN service in the business process, add a Business Rule task from the left toolbar or from the start-node options and insert the task in the relevant location in the process flow.
For this example, the following
Accept Train business process incorporates the DMN service in the Route To Rail node:
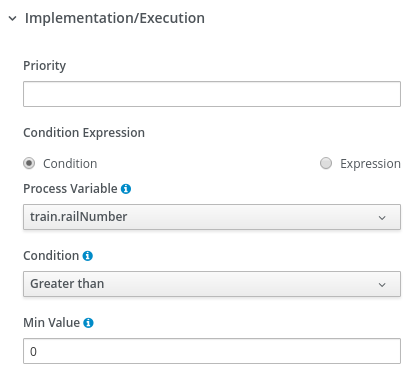
Select the business rule task node that you want to use for the DMN service, click Properties in the upper-right corner of the process designer, and under Implementation/Execution, define the following fields:
Rule Language: Select DMN.
Namespace: Enter the unique namespace from the DMN model file. Example: https://www.drools.org/kie-dmn
Decision Name: Enter the name of the DMN decision node that you want to invoke in the selected process node. Example: Rail
DMN Model Name: Enter the DMN model name. Example: Compute Rail
When you explore the root node, ensure that the Namespace and DMN Model Name fields consist of the same value in BPMN as DMN diagram.
Under Data Assignments → Assignments, click the Edit icon and add the DMN input and output data to define the mapping between the DMN service and the process data.
For the Route To Rail DMN service node in this example, you add an input assignment for Train that corresponds to the input node in the DMN model, and add an output assignment for Rail that corresponds to the decision node in the DMN model. The Data Type must match the type that you set for that node in the DMN model, and the Source
and Target definition is the relevant variable or field for the specified object.
-
Click Save to save the data input and output data.
Define the remainder of your business process according to how you want the completed DMN service to be handled.
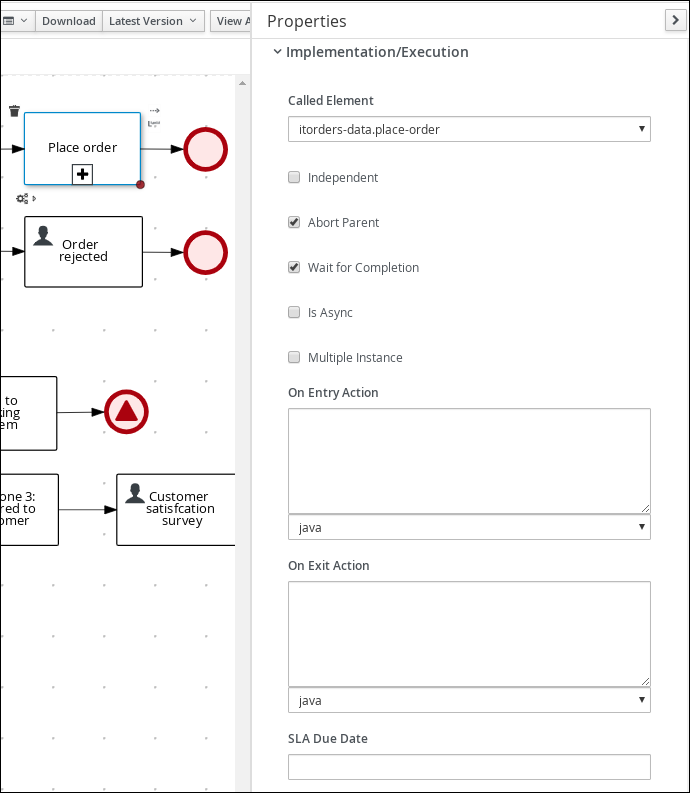
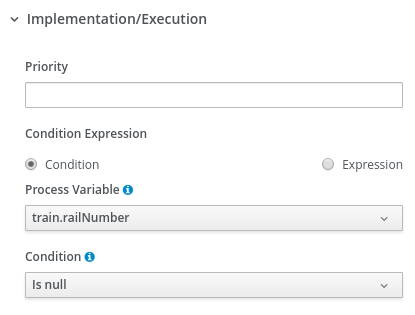
For this example, the Properties → Implementation/Execution → On Exit Action value is set to the following code to store the rail number after the
Route To Rail DMN service is complete:
After you define your business process with the incorporated DMN service, save your process in the process designer, deploy the project, and run the corresponding process definition to invoke the DMN service.
For this example, when you deploy the TrainStation project and run the corresponding process definition, you open the process instance form for the Accept Train process definition and set the departure station and destination station fields to test the execution:
After the process is executed, a message appears in the server log with the train route that you specified:
Chapter 17. Additional resourcesPart II. Interacting with processes and tasks
As a knowledge worker, you use Business Central in Red Hat Process Automation Manager to run processes and tasks of the business process application developed by citizen developers. A business process is a series of steps that are executed as defined in the process flow. To effectively interact with processes and tasks, you must have a clear understanding of the business process and be able to determine the current step of a process or task. You can start and stop tasks; search and filter tasks and process instances; delegate, claim, and release tasks; set a due date and priority of tasks; view and add comments to tasks; and view the task history log.
Chapter 18. Business processes in Business Central
A business process application created by a citizen developer in Business Central depicts the flow of the business process as a series of steps. Each step executes according to the process flow chart. A process can consist of one or more smaller discrete tasks. As a knowledge worker, you work on processes and tasks that occur during business process execution.
As an example, using Red Hat Process Automation Manager, the mortgage department of a financial institution can automate the complete business process for a mortgage loan. When a new mortgage request comes in, a new process instance is created in the mortgage application. Because all requests follow the same set of rules for processing, consistency in every step is ensured. This results in an efficient process that reduces processing time and effort.
18.1. Knowledge worker user
Consider the example of a customer account representative processing mortgage loan requests at a financial institution. As a customer account representative, you can perform the following tasks:
Accept and decline mortgage requests
Search and filter through requests
Delegate, claim, and release requests
Set a due date and priority on requests
View and comment on requests
View the request history log
Chapter 19. Knowledge worker tasks in Business Central
A task is a part of the business process flow that a given user can claim and perform. You can handle tasks in Menu → Track → Task Inbox in Business Central. It displays the task list for the logged-in user. A task can be assigned to a particular user, multiple users, or to a group of users. If a task is assigned to multiple users or a group of users, it is visible in the task lists of all the users and any user can claim the task. When a task is claimed by a user, it is removed from the task list of other users.
You can start user tasks in Menu → Manage → Tasks and in Menu → Track → Task Inbox in Business Central.
Ensure that you are logged in and have appropriate permissions for starting and stopping tasks.
Procedure -
In Business Central, go to Menu → Track → Task Inbox.
On the Task Inbox page, click the task to open it.
On the Work tab of the task page, click Start. Once you start a task, its status changes to InProgress.
You can view the status of tasks on the Task Inbox as well as on the Manage Tasks page.
Only users with the
process-admin role can view the task list on the Manage Tasks page. Users with the admin role can access the Manage Tasks page, however they see only an empty task list.
You can stop user tasks from the Tasks and Task Inbox page.
Procedure -
In Business Central, go to Menu → Track → Task Inbox.
On the Task Inbox page, click the task to open it.
On the Work tab of the task page, click Complete.
After tasks are created in Business Central, you can delegate them to others.
A user assigned with any role can delegate, claim, or release tasks visible to the user. On the Task Inbox page, the Actual Owner column displays the name of the current owner of the task.
Procedure -
In Business Central, go to Menu → Track → Task Inbox.
On the Task Inbox page, click the task to open it.
On the task page, click the Assignments tab.
In the User field, enter the name of the user or group you want to delegate the task to.
Click Delegate. Once a task is delegated, the owner of the task changes.
After tasks are created in Business Central, you can claim the released tasks. A user can claim a task from the Task Inbox page only if the task is assigned to a group the user belongs to.
Procedure -
In Business Central, go to Menu → Track → Task Inbox.
On the Task Inbox page, click the task to open it.
On the Work tab of the task page, click Claim.
To claim the released task from the Task Inbox page, do any of the following tasks:
Click Claim from the three dots in the Actions column.
Click Claim and Work from the three dots in the Actions column to open, view, and modify the details of a task.
The user who claims a task becomes the owner of the task.
After tasks are created in Business Central, you can release your tasks for others to claim.
Procedure -
In Business Central, go to Menu → Track → Task Inbox.
On the Task Inbox page, click the task to open it.
On the task page, click Release. A released task has no owner.
19.6. Bulk actions on tasks
In the Tasks and Task Inbox pages in Business Central, you can perform bulk actions over multiple tasks in a single operation.
If a specified bulk action is not permitted based on the task status, a notification is displayed and the operation is not executed on that particular task.
19.6.1. Claiming tasks in bulk
After you create tasks in Business Central, you can claim the available tasks in bulk.
Procedure
In Business Central, complete one of the following steps:
To view the Task Inbox
page, select Menu → Track → Task Inbox.
To view the Tasks page, select Menu → Manage → Tasks.
To claim the tasks in bulk, on the Task Inbox page or the Manage Tasks page, select two or more tasks from the Task table.
From the Bulk Actions drop-down list, select Bulk Claim.
To confirm, click Claim on the Claim selected tasks window.
For each task selected, a notification is displayed showing the result.
19.6.2. Releasing tasks in bulk
You can release your owned tasks in bulk for others to claim.
Procedure
In Business Central, complete one of the following steps:
To view the Task Inbox page, select Menu → Track → Task Inbox.
To view the Tasks page, select Menu → Manage → Tasks.
To release the tasks in bulk, on the Task Inbox page or the Manage Tasks page, select two or more tasks from the Task table.
From the Bulk Actions drop-down list, select Bulk Release.
To confirm, click Release on the Release selected tasks window.
For each task selected, a notification is displayed showing the result.
19.6.3. Resuming tasks in bulk
If there are suspended tasks in Business Central, you can resume them in bulk.
Procedure
In Business Central, complete one of the following steps:
To view the Task Inbox page, select Menu → Track → Task Inbox.
To view the Tasks page, select Menu → Manage → Tasks.
To resume the tasks in bulk, on the Task Inbox page or the Manage Tasks page, select two or more tasks from the Task table.
From the Bulk Actions drop-down list, select Bulk Resume.
To confirm, click Resume on the Resume selected tasks window.
For each task selected, a notification is displayed showing the result.
19.6.4. Suspending tasks in bulk
After you create tasks in Business Central, you can suspend the tasks in bulk.
Procedure
In Business Central, complete one of the following steps:
To view the Task Inbox page, select Menu → Track → Task Inbox.
To view the Tasks page, select Menu → Manage → Tasks.
To suspend the tasks in bulk, on the Task Inbox page or the Manage Tasks page, select two or more tasks from the Task table.
From the Bulk Actions drop-down list, select Bulk Suspend.
To confirm, click Suspend on the Suspend selected tasks window.
For each task selected, a notification is displayed showing the result.
19.6.5. Reassigning tasks in bulk
After you create tasks in Business Central, you can reassign your tasks in bulk and delegate them to others.
Procedure
In Business Central, complete one of the following steps:
To view the Task Inbox page, select Menu → Track → Task Inbox.
To view the Tasks page, select Menu → Manage → Tasks.
To reassign the tasks in bulk, on the Task Inbox page or the Manage Tasks page, select two or more tasks from the Task table.
From the Bulk Actions drop-down list, select Bulk Reassign.
In the Tasks reassignment window, enter the user ID of the user to whom you want to reassign the tasks.
Click Delegate.
For each task selected, a notification is displayed showing the result.
Chapter 20. Task filtering in Business Central
Business Central provides built-in filters to help you search tasks. You can filter tasks by attributes such as Status, Filter By, Process Definition Id, and Created On. It is also possible to create custom task filters using the Advanced Filters option. The newly created custom filter is added to the Saved Filters pane, which is accessible by clicking on the star icon on the left of the Task Inbox page.
20.1. Managing task list columns
In the task list on the Task Inbox and Manage Tasks windows, you can specify what columns to view and you can change the order of columns to better manage task information.
Only users with the process-admin role can view the task list on the Manage Tasks page. Users with the admin role can access the Manage Tasks page, however they see only an empty task list.
Procedure -
In Business Central, go to Menu → Manage → Tasks or Menu → Track → Task Inbox.
On the Manage Task or Task Inbox page, click the Show/hide columns icon to the right of Bulk Actions.
Select or deselect columns to display. As you make changes to the list, columns in the task list appear or disappear.
To rearrange the columns, drag the column heading to a new position. Note that your pointer must change to the icon shown in the following illustration before you can drag the column:
To save your changes as a filter, click Save Filters, enter a name, and click Save.
To use your new filter, click the Saved Filters icon (star) on the left of the screen and select your filter from the list.
20.2. Filtering tasks using basic filters
Business Central provides basic filters for filtering and searching through tasks based on their attributes such as Status, Filter By, Process Definition Id, and Created On.
Procedure -
In Business Central, go to Menu → Track → Task Inbox.
On the Task Inbox page, click the filter icon on the left of the page to expand the Filters pane and select the filters you want to use:
Status: Filter tasks based on their status.
Filter By: Filter tasks based on Id, Task, Correlation Key, Actual Owner, or Process Instance Description attribute.
Process Definition Id: Filter tasks based on process definition ids.
Created On: Filter tasks based on their creation date.
You can use the Advanced Filters option to create custom filters in Business Central.
20.3. Filtering tasks using advanced filters
You can create custom task filters using the Advanced Filters option in Business Central.
Procedure -
In Business Central, go to Menu → Track → Task Inbox.
On the Task Inbox page, click the advanced filters icon on the left of the page to expand the Advanced Filters panel.
In the Advanced Filters panel, enter the filter name and description, and click Add New.
Select an attribute from the Select column drop-down list, such as Name. The content of the drop-down changes to Name != value1.
Click the drop-down again and choose the required logical query. For the Name attribute, choose equals to.
Change the value of the text field to the name of the task you want to filter.
The name must match the value defined in the business process of the project.
Click Save and the tasks are filtered according to the filter definition.
Click the star icon to open the Saved Filters pane.
In the Saved Filters pane, you can view the saved advanced filters.
20.4. Managing tasks using default filter
You can set a task filter as a default filter using the Saved Filter option in Business Central. A default filter will be executed every time when the page is open by the user.
Procedure -
In Business Central, go to Menu → Track → Task Inbox or go to Menu → Manage → Tasks.
On the Task Inbox page or the Manage Tasks page, click the star icon on the left of the page to expand the Saved Filters panel.
In the Saved Filters panel, you can view the saved advanced filters.
20.5. Viewing task variables using basic filters
Business Central provides basic filters to view task variables in Manage Tasks and Task Inbox. You can view the task variables of the task as columns using Show/hide columns.
Procedure -
In Business Central, go to Menu
→ Manage → Tasks or go to Menu → Track → Task Inbox.
On the Task Inbox page, click the filter icon on the left of the page to expand the Filters panel
In the Filters panel, select the Task Name.
The filter is applied to the current task list.
Click Show/hide columns on the upper right of the tasks list and the task variables of the specified task id will be displayed.
Click the star icon to open the Saved Filters panel.
In the Saved Filters panel, you can view all the saved advanced filters.
20.6. Viewing task variables using advanced filters
You can use the Advanced Filters option in Business Central to view task variables in Manage Tasks and Task Inbox. When you create a filter with the task defined, you can view the task variables of the task as columns using Show/hide columns.
Procedure -
In Business Central, go to Menu → Manage → Tasks or go to Menu → Track → Task Inbox.
On the Manage Tasks page or the Task Inbox page, click the advanced filters icon to expand the Advanced Filters panel.
In the Advanced Filters panel, enter the name and description of the filter, and click Add New.
From the Select column list, select the
name attribute. The value will change to name != value1.
From the Select column list, select equals to for the logical query.
In the text field, enter the name of the task.
Click Save and the filter is applied on the current task list.
Click Show/hide columns on the upper right of the tasks list and the task variables of the specified task id will be displayed.
Click the star icon to open the Saved Filters panel.
In the Saved Filters panel, you can view all the saved advanced filters.
Chapter 21. Process instance filtering in Business Central
Business Central now provides you with basic and advanced filters to help you filter and search through process instances. You can filter processes by attributes such as State, Errors, Filter By, Name, Start Date, and Last update. You can also create custom filters using the Advanced Filters option. The newly created custom filter is added to the Saved Filters pane, which is accessible by clicking on the star icon on the left of the Manage Process Instances page.
All users except those with manager or rest-all roles can access and filter process instances in Business Central.
21.1. Filtering process instances using basic filters
Business Central provides basic filters for filtering and searching through process instances based on their attributes such as State, Errors, Filter By, Name, Start Date, and Last update.
Procedure -
In Business Central, go to Menu → Manage → Process Instances.
On the Manage Process Instances page, click the filter icon on the left of the page to expand the Filters pane and select the filters you want to use:
State: Filter process instances based on their state (Active, Aborted, Completed, Pending, and Suspended).
Errors: Filter process instances that contain at least one or no errors.
Filter By: Filter process instances based on Id, Initiator, Correlation Key, or Description attribute.
Name: Filter process instances based on process definition name.
Definition ID: The ID of the instance definition.
Deployment ID: The ID of the instance deployment.
SLA Compliance: SLA compliance status (Aborted, Met, N/A, Pending, and Violated).
Parent Process ID: The ID of the parent process instance.
Start Date: Filter process instances based on their creation date.
Last update: Filter process instances based on their last modified date.
You can also use the Advanced Filters option to create custom filters in Business Central.
21.2. Filtering process instances using advanced filters
You can create custom process instance filters using the Advanced Filters option in Business Central.
Procedure -
In Business Central, click Menu → Manage → Process Instances.
On the Manage Process Instances page, click the Advanced Filters icon.
In the Advanced Filters pane, enter the name and description of the filter, and click Add New.
Select an attribute from the Select column drop-down list, for example, processName. The content of the drop-down changes to processName != value1.
Click the drop-down again and choose the required logical query. For the processName attribute, choose equals to.
Change the value of the text field to the name of the process you want to filter.
The
processName must match the value defined in the business process of the project.
Click Save and the processes are filtered according to the filter definition.
Click the star icon to open the Saved Filters pane.
In the Saved Filters pane, you can view all the saved advanced filters.
21.3. Managing process instances using default filter
You can set a process instance filter as a default filter using the Saved Filter option in Business Central. A default filter will be executed every time when the page is open by the user.
Procedure -
In Business Central, go to Menu → Manage → Process Instances.
On the Manage Process Instances page, click the star icon on the left of the page to expand the Saved Filters panel.
In the Saved Filters panel, you can view the saved advanced filters.
21.4. Viewing process instance variables using basic filters
Business Central provides basic filters to view process instance variables. You can view the process instance variables of the process as columns using Show/hide columns.
Procedure -
In Business Central, go to Menu → Manage → Process Instances.
On the Manage Process Instances page, click the filter icon on the left of the page to expand the Filters panel.
In the Filters panel, select the Definition Id.
The filter is applied on the current process instance list.
Click Show/hide columns on the upper right of the process instances list and the process instance variables of the specified process id will be displayed.
Click the star icon to open the Saved Filters panel.
In the Saved Filters panel, you can view all the saved advanced filters.
21.5. Viewing process instance variables using advanced filters
You can use the Advanced Filters option in Business Central to view process instance variables. When you create a filter over the column processId, you can view the process instance variables of the process as columns using Show/hide columns.
Procedure -
In Business Central, go to Menu → Manage → Process Instances.
On the Manage Process Instances page, click the advanced filters icon to expand the Advanced Filters panel.
In the Advanced Filters panel, enter the name and description of the filter, and click Add New.
From the Select column list, select the
processId attribute. The value will change to processId != value1.
From the Select column list, select equals to for the logical query.
In the text field, enter the name of the process id.
Click Save and the filter is applied on the current process instance list.
Click Show/hide columns on the upper right of the process instances list and the process instance variables of the specified process id will be displayed.
Click the star icon to open the Saved Filters panel.
In the Saved Filters panel, you can view all the saved advanced filters.
Chapter 22. Configuring emails in task notification
Earlier it was possible to send notifications only to users or group of users in Business Central. Now you can directly add any email addresses as well.
Procedure
Create a business process.
For more information about creating a business process in Business Central, see Chapter 5, Creating a business process in Business Central.
Create a user task.
For more information about creating a user task in Business Central, see Section 5.4, “Creating user tasks”.
In the upper-right corner of the screen, click the Properties icon.
Expand Implementation/Execution and click
next to Notifications, to open the Notifications window.
Click Add.
In the Notifications window, enter an email address in the To: email(s)
field to set the recipients of the task notification emails.
You can add multiple email addresses separated by comma.
Enter the subject and body of the email.
Click Ok.
You can see the added email addresses in the To: email(s) column in the Notifications window.
Click Ok.
Chapter 23. Setting the due date and priority of a task
You can set the priority, due date, and time of a task in Business Central from the Task Inbox page. Note that all users may not have permissions for setting priority and the due date of a task.
Procedure -
In Business Central, go to Menu → Track → Task Inbox.
On the Task Inbox page, click the task to open it.
On the task page, click the Details tab.
In the Due Date field, select the required date from the calendar and the due time from the drop-down list.
In the Priority field, select the required priority.
Click Update.
Chapter 25. Viewing the history log of a task
You can view the history log of a task in Business Central from the Logs tab of task. The history log lists all the events in the "Date Time: Task event" format.
Procedure -
In Business Central, go to Menu → Track → Task Inbox.
On the Task Inbox page, click the task to open it.
On the task page, click the Logs tab.
All events that take place during the task life cycle is listed in the Logs tab.
Chapter 26. Viewing the history log of a process instance
You can view the history log of a process instance in Business Central from its Logs tab. The log lists all the events in the Date Time: Event Node Type: Event Type format.
You can filter the logs based on Event Node Type and Event Type. You can also view the details of the human nodes in the logs.
Procedure -
In Business Central, go to Menu → Manage → Process Instances.
On the Process Instances page, click the process instance whose log you want to view.
On the instance page, click the Logs tab.
Select the required check boxes from Event Node Type and Event Type pane to filter the log as per your need.
To view additional information regarding human nodes, expand Details.
Click Reset to revert to the default filter selection.
All events that occur in a process instance life cycle are listed in the Logs tab.
Part III. Managing and monitoring business processes in Business Central
As a process administrator, you can use Business Central in Red Hat Process Automation Manager to manage and monitor process instances and tasks running on a number of projects. From Business Central you can start a new process instance, verify the state of all process instances, and abort processes. You can view the list of jobs and tasks associated with your processes, as well as understand and communicate any process errors.
Chapter 27. Process monitoring
Red Hat Process Automation Manager provides real-time monitoring for your business processes and includes the following capabilities:
Business managers can monitor processes in real time.
Customers can monitor the current status of their requests.
Administrators can easily monitor any errors related to process execution.
Chapter 28. Process definitions and process instances in Business Central
A process definition is a Business Process Model and Notation (BPMN) 2.0 file that serves as a container for a process and its BPMN diagram. The process definition shows all of the available information about the business process, such as any associated sub-processes or the number of users and groups that are participating in the selected definition.
A process definition also defines the import entry for imported processes that the process definition uses, and the relationship entries.
Chapter 29. Process instance management
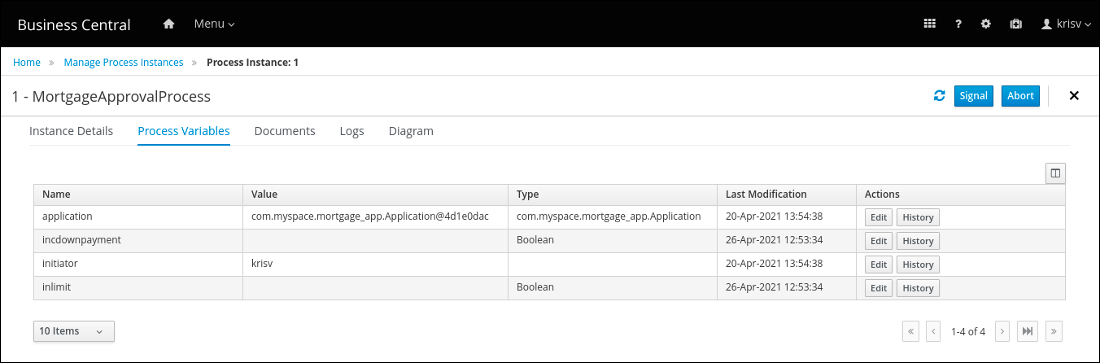
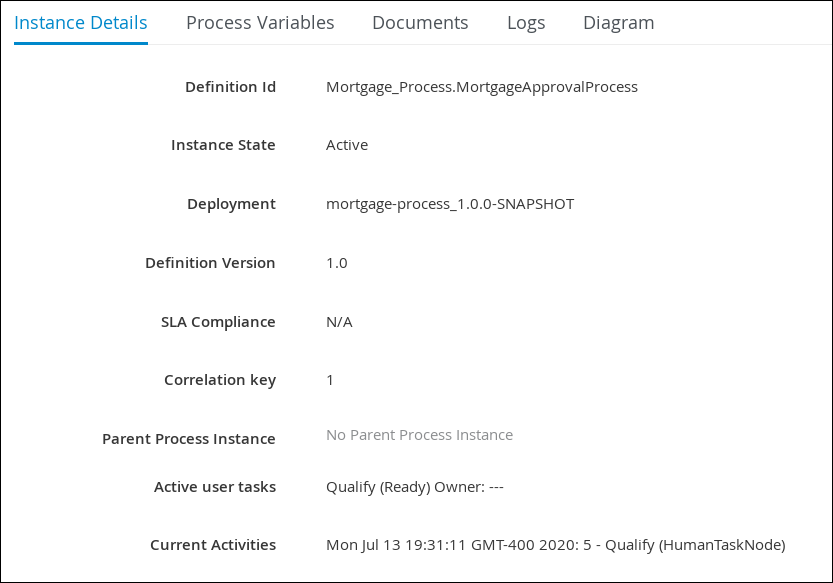
To view process instances, in Business Central, click Menu → Manage → Process Instances. Each row in the Manage Process Instances list represents a process instance from a particular process definition. Each execution is differentiated from all the others by the internal state of the information that the process is manipulating. Click on a process instance to view the corresponding tabs with runtime information related to the process.
-
Instance Details: Provides an overview about what is going on inside the process. It displays the current state of the instance and the current activity that is being executed.
Process Variables: Displays all of the process variables that are being manipulated by the instance, with the exception of the variables that contain documents. You can edit the process variable value and view its history.
Documents: Displays process documents if the process contains a variable of the type org.jbpm.Document. This enables access, download, and manipulation of the attached documents.
Logs: Displays process instance logs for the end users. For more information, see Interacting with processes and tasks.
Diagram: Tracks the progress of the process instance through the BPMN2 diagram. The node or nodes of the process flow that are in progress are highlighted in red. Reusable sub-processes appear collapsed within the parent process. Double-click on the reusable sub-process node to open its diagram from the parent process diagram.
For information on user credentials and conditions to be met to access KIE Server runtime data, see Planning a Red Hat Process Automation Manager installation.
29.1. Process instance filtering
For process instances in Menu → Manage → Process Instances, you can use the Filters and Advanced Filters panels to sort process instances as needed.
Procedure -
In Business Central, go to Menu → Manage → Process Instances.
On the Manage Process Instances page, click the Filters icon on the left of the page to select the filters that you want to use:
State: Filter process instances based on their state (Active, Aborted, Completed, Pending, and Suspended).
Errors: Filter process instances that contain at least one or no errors.
Filter By: Filter process instances based on the following attributes:
Id: Filter by process instance ID.
Input:
Numeric
Initiator: Filter by the user ID of the process instance initiator.
The user ID is a unique value, and depends on the ID management system.
Input: String
Correlation key: Filter by correlation key.
Input: String
Description: Filter by process instance description.
Input: String
Name: Filter process instances based on process definition name.
Definition ID: The ID of the instance definition.
Deployment ID: The ID of the instance deployment.
SLA Compliance: SLA compliance status (Aborted, Met, N/A, Pending, and Violated).
Parent Process ID: The ID of the parent process.
Start Date: Filter process instances based on their creation date.
Last update: Filter process instances based on their last modified date.
You can also use the Advanced Filters option to create custom filters in Business Central.
29.2. Creating a custom process instance list
You can view the list of all the running process instances in Menu → Manage → Process Instances in Business Central. From this page, you can manage the instances during run time and monitor their execution. You can customize which columns are displayed, the number of rows displayed per page, and filter the results. You can also create a custom process instance list.
Prerequisites -
A project with a process definition has been deployed in Business Central.
Procedure -
In Business Central, go to Menu → Manage → Process Instances.
In the Manage Process Instances page, click the advanced filters icon on the left to open the list of process instance Advanced Filters options.
In the Advanced Filters panel, enter the name and description of the filter that you want to use for your custom process instance list, and click Add New.
From the list of filter values, select the parameters and values to configure the custom process instance list, and click Save.
A new filter is created and immediately applied to the process instances list. The filter is also saved in the Saved Filters list. You can access saved filters by clicking the star icon on the left side of the Manage Process Instances page.
29.3. Managing process instances using a default filter
You can set a process instance filter as a default filter using the Saved Filter option in Business Central. A default filter will be executed every time when the page is open by the user.
Procedure -
In Business Central, go to Menu → Manage → Process Instances.
On the Manage Process Instances page, click the star icon on the left of the page to expand the Saved Filters panel.
In the Saved Filters panel, you can view the saved advanced filters.
29.4. Viewing process instance variables using basic filters
Business Central provides basic filters to view process instance variables. You can view the process instance variables of the process as columns using Show/hide columns.
Procedure -
In Business Central, go to Menu → Manage → Process Instances.
On the Manage Process Instances page, click the filter icon on the left of the page to expand the Filters panel.
In the Filters panel, select the Definition Id and select a definition ID from the list.
The filter is applied to the current process instance list.
Click columns icon (to the right of Bulk Actions) in the upper-right of the screen to display or hide columns in the process instances table.
Click the star icon to open the Saved Filters panel.
In the Saved Filters panel, you can view all the saved advanced filters.
29.5. Viewing process instance variables using advanced filters
You can use the Advanced Filters option in Business Central to view process instance variables. When you create a filter over the column processId, you can view the process instance variables of the process as columns using Show/hide columns.
Procedure -
In Business Central, go to Menu → Manage → Process Instances.
On the Manage Process Instances page, click the advanced filters icon to expand the Advanced Filters panel.
In the Advanced Filters panel, enter the name and description of the filter, and click Add New.
From the Select column list, select the
processId attribute. The value will change to processId != value1.
From the Select column list, select equals to for the query.
In the text field, enter the name of the process id.
Click Save and the filter is applied on the current process instance list.
Click the columns icon (to the right of Bulk Actions) in the upper-right of the process instances list and the process instance variables of the specified process ID will be displayed.
Click the star icon to open the Saved Filters panel.
In the Saved Filters panel, you can view all the saved advanced filters.
29.6. Aborting a process instance using Business Central
If a process instance becomes obsolete, you can abort the process instance in Business Central.
Procedure -
In Business Central, go to Menu → Manage → Process Instances to view the list of available process instances.
Select the process instance you want to abort from the list.
In the process details page, click the Abort button in the upper-right corner.
29.7. Signaling process instances from Business Central
You can signal a process instance from Business Central.
Prerequisites -
A project with a process definition has been deployed in Business Central.
Procedure -
In Business Central, go to Menu → Manage → Process Instances.
Locate the required process instance, click the
button and select Signal from the drop-down menu.
Fill the following fields:
Signal Name: Corresponds to the
SignalRef or MessageRef attributes of the signal. This field is required.
You can also send a Message event to the process by adding the Message- prefix in front of the MessageRef value.
Signal Data: Corresponds to data accompanying the signal. This field is optional.
When using the Business Central user interface, you can only signal Signal intermediate catch events.
29.8. Asynchronous signal events
When several process instances from different process definitions are waiting for the same signal, they are executed sequentially in the same thread. But, if one of those process instances throws a runtime exception, all the other process instances are affected and usually result in a rolled back transaction. To avoid this situation, Red Hat Process Automation Manager supports using asynchronous signals events for:
Throwing intermediate signal events
End events
29.8.2. Configuring asynchronous signals for end events
End events indicate the completion of a business process. All end events, with the exception of the none and terminate end events, are throw events. A throwing signal end event is used to finish a process or sub-process flow. When the execution flow enters the element, the execution flow finishes and produces a signal identified by its SignalRef property.
You can configure an asynchronous signal for end events in Business Central.
Prerequisites -
You have created a project in Business Central and it contains at least one business process asset.
A project with a process definition has been deployed in Business Central.
Procedure -
Open a business process asset.
In the process designer canvas, drag and drop the End Signal from the left toolbar.
In the upper-right corner, click
to open the Properties panel.
Expand Data Assignments.
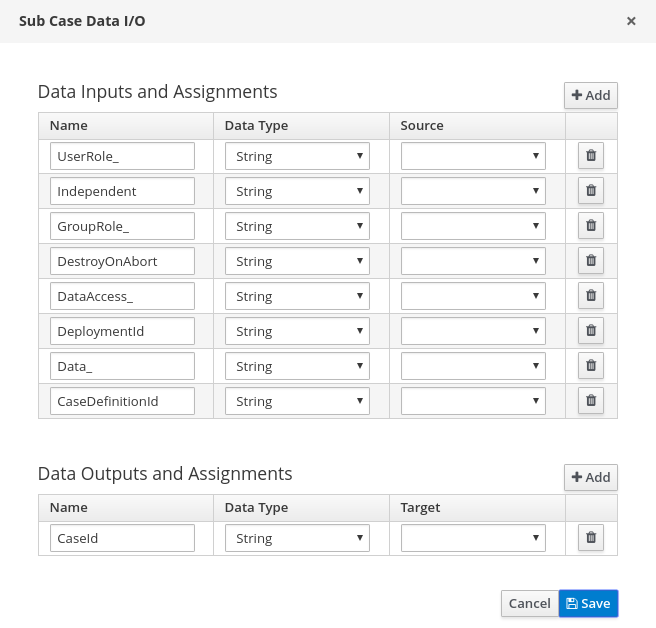
Click the box under the Assignments sub-section. The Task Data I/O dialog box opens.
Click Add next to Data Inputs and Assignments.
Enter a name of the throw event as async in the Name field.
Leave the Data Type and Source fields blank.
Click OK.
It will automatically set the executor service on each session. This ensures that each process instance is signaled in a different transaction.
29.9. Process instance operations
Process instance administration API exposes the following operations for the process engine and the individual process instance.
get process nodes - by process instance id: Returns all nodes, including all embedded sub-processes that exist in the process instance. You must retrieve the nodes from the specified process instance to ensure that the node exists and includes a valid ID so that it can be used by other administration operations.
cancel node instance - by process instance id and node instance id: Cancels a node instance within a process instance using the process and node instance IDs.
retrigger node instance - by process instance id and node instance id: Re-triggers a node instance by canceling the active node instance and creates a new node instance of the same type using the process and node instance IDs.
update timer - by process instance id and timer id: Updates the timer expiration of an active timer based on the time elapsed since the timer was scheduled. For example, if a timer was initially created with delay of one hour and after thirty minutes you set it to update in two hours, it expires in one and a half hours from the time it was updated.
delay: The duration after the timer expires.
period: The interval between the timer expiration for cycle timers.
repeat limit: Limits the expiration for a specified number for cycle timers.
update timer relative to current time - by process instance id and timer id: Updates the timer expiration of an active timer based on the current time. For example, if a timer was initially created with delay of one hour and after thirty minutes you set it to update in two hours, it expires in two hours from the time it was updated.
list timer instances - by process instance id: Returns all active timers for a specified process instance.
trigger node - by process instance id and node id: Triggers any node in a process instance at any time.
Chapter 30. Task management
Tasks that are assigned to the current user appear in Menu → Track → Task Inbox in Business Central. You can click a task to open and begin working on it.
A user task can be assigned to a particular user, multiple users, or to a group. If assigned to multiple users or a group it appears in the task lists of all assigned users and any of the possible actors can claim the task. When a task is assigned to another user it no longer appears in your Task Inbox.
Business administrators can view and manage all user tasks from the Tasks page in Business Central, located under Menu → Manage → Tasks. Users with the admin or process-admin role can access the Tasks page but do not have access rights to view and manage tasks by default.
To manage all the tasks, a user must be specified as a process administrator by defining any of the following conditions:
User is specified as task admin user. The default value is Administrator.
User belongs to the task administrators group. The default value is Administrators.
You can configure the user and user group assignment with the org.jbpm.ht.admin.user and org.jbpm.ht.admin.group system properties.
You can open, view, and modify the details of a task, such as the due date, the priority, or the task description, by clicking a task in the list. The following tabs are available in the task page:
Work: Displays basic details about the task and the task owner. You can click the Claim button to claim the task. To undo the claim process, click the Release button.
Details: Displays information such as task description, status, and due date.
Assignments: Displays the current owner of the task and enables you to delegate the task to another person or group.
Comments: Displays comments added by task user(s). You can delete an existing comment and add a new comment.
Admin: Displays the potential owner of the task and enables you to forward the task to another person or group. It also displays the actual owner of the task and you can send a reminder to the actual owner of the task.
Logs: Displays task logs containing task life cycle events (such as task started, claimed, completed), updates made to task fields (such as task due date and priority).
You can filter the tasks based on the filter parameters available by clicking the Filters icon on the left side of the page. For more information about filtering, see Section 30.1, “Task filtering”.
In addition to these, you can create custom filters to filter tasks based on the query parameters you define. For more information about custom tasks filters, see Section 30.2, “Creating custom task filters”.
For tasks in Menu → Manage → Tasks and in Menu → Track → Task Inbox, you can use the Filters and Advanced Filters panels to sort tasks as needed.
The Manage Tasks page is only available to administrators and process administrators.
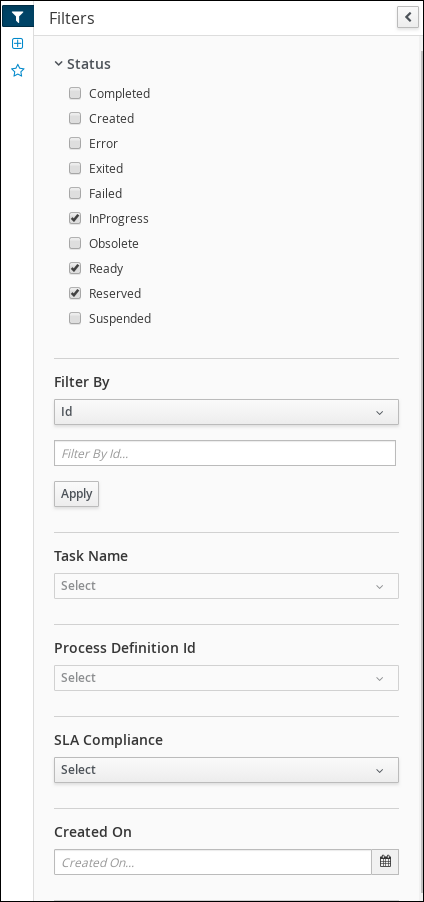
You can filter tasks by the following attributes in the Filters panel:
- Status
Filter by task status. You can select more than one status to display results that meet any of the selected states. Removing the status filter displays all processes, regardless of status.
The following filter states are available:
Completed
Created
Error
Exited
Failed
InProgress
Obsolete
Ready
Reserved
Suspended
Filter by process instance ID.
Input: Numeric
Filter by task name.
Input: String
- Correlation key
Filter by correlation key.
Input: String
- Actual Owner
Filter by the task owner.
The actual owner refers to the user responsible for executing the task. The search is based on user ID, which is a unique value and depends on the ID management system.
Input: String
- Process Instance Description
Filter by process instance description.
Input: String
- Task Name
-
Filter by task name.
- Process Definition Id
-
Filter by process definition Id.
- SLA Compliance
Filter by SLA compliance state.
The following filter states are available:
Aborted
Pending
Violated
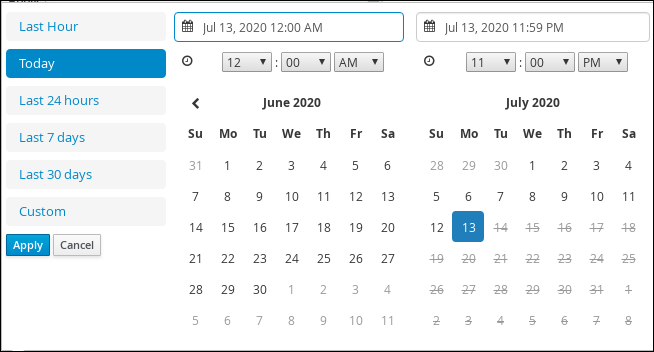
Filtering by date or time.
This filter has the following quick filter options:
Last Hour
Today
Last 24 Hours
Last 7 Days
Last 30 Days
Custom
Selecting Custom date and time filtering opens a calendar tool for selecting a date and time range.
30.2. Creating custom task filters
You can create a custom task filter based on a provided query in Menu → Manage → Tasks, or in Menu → Track → Task Inbox for tasks assigned to the current user.
Procedure -
In Business Central, go to Menu → Manage → Tasks
In the Manage Tasks page, click the advanced filters icon on the left to open the list of Advanced Filters options.
In the Advanced Filters panel, enter the name and description of the filter, and click Add New.
In the Select column drop-down menu, choose name.
The content of the drop-down menu changes to
name != value1.
Click the drop-down menu again and choose equals to.
Rewrite the value of the text field to the name of the task you want to filter. Note that the name must match the value defined in the associated business process:
Click Ok to save the custom task filter.
After you apply the filter with a specified restriction, the set of configurable columns is based on the specific custom task filter and contains the following column options:
30.3. Managing tasks using a default filter
You can set a task filter as a default filter using the Saved Filter option in Business Central. A default filter will be executed every time when the page is open by the user.
Procedure -
In Business Central, go to Menu → Track → Task Inbox or go to Menu → Manage → Tasks
On the Task Inbox page or the Manage Tasks page, click the star icon on the left of the page to expand the Saved Filters panel.
In the Saved Filters panel, you can view the saved advanced filters.
30.4. Viewing task variables using basic filters
Business Central provides basic filters to view task variables in Manage Tasks and Task Inbox. You can view the task variables of the task as columns using Show/hide columns.
Procedure -
In Business Central, go to Menu → Manage → Tasks or go to Menu → Track → Task Inbox.
On the Task Inbox page, click the filter icon on the left of the page to expand the Filters panel
In the Filters panel, select the Task Name.
The filter is applied on the current task list.
Click Show/hide columns on the upper right of the tasks list and the task variables of the specified task id will be displayed.
Click the star icon to open the Saved Filters panel.
In the Saved Filters panel, you can view all the saved advanced filters.
30.5. Viewing task variables using advanced filters
You can use the Advanced Filters option in Business Central to view task variables in Manage Tasks and Task Inbox. When you create a filter with the task defined, you can view the task variables of the task as columns using Show/hide columns.
Procedure -
In Business Central, go to Menu → Manage → Tasks or go to Menu → Track → Task Inbox.
On the Manage Tasks page or the Task Inbox page, click the advanced filters icon to expand the Advanced Filters panel.
In the Advanced Filters panel, enter the name and description of the filter, and click Add New.
From the Select column list, select the
name attribute. The value will change to name != value1.
From the Select column list, select equals to for the logical query.
In the text field, enter the name of the task.
Click Save and the filter is applied on the current task list.
Click Show/hide columns on the upper right of the tasks list and the task variables of the specified task id will be displayed.
Click the star icon to open the Saved Filters panel.
In the Saved Filters panel, you can view all the saved advanced filters.
30.6. Managing custom tasks in Business Central
Custom tasks (work items) are tasks that can run custom logic. You can customize and reuse custom tasks across multiple business processes or across all projects in Business Central. You can also add custom elements in the designer palette, including name, icon, sub-category, input and output parameters, and documentation. Red Hat Process Automation Manager provides a set of custom tasks within the custom task repository in Business Central. You can enable or disable the default custom tasks and upload custom tasks into Business Central to implement the tasks in the relevant processes.
Red Hat Process Automation Manager includes a limited set of supported custom tasks. Custom tasks that are not included in Red Hat Process Automation Manager are not supported.
Procedure
In Business Central, click
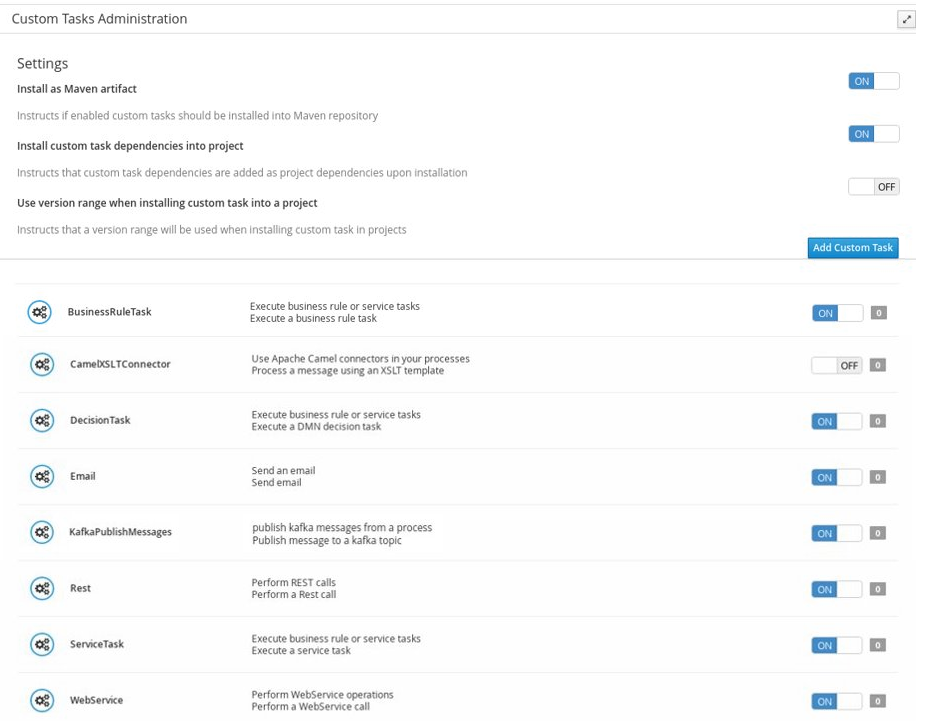
in the upper-right corner and select Custom Tasks Administration.
This page lists the custom task installation settings and available custom tasks for processes in projects throughout Business Central. The custom tasks that you enable on this page become available in the project-level settings where you can then install each custom task to be used in processes. The way in which the custom tasks are installed in a project is determined by the global settings that you enable or disable under Settings on this Custom Tasks Administration page.
Under Settings, enable or disable each setting to determine how the available custom tasks are implemented when a user installs them at the project level.
The following custom task settings are available:
Install as Maven artifact: Uploads the custom task JAR file to the Maven repository that is configured with Business Central, if the file is not already present.
Install custom task dependencies into project: Adds any custom task dependencies to the pom.xml file of the project where the task is installed.
Use version range when installing custom task into project: Uses a version range instead of a fixed version of a custom task that is added as a project dependency. Example: [7.16,) instead of 7.16.0.Final
Enable or disable (set to ON or OFF) any available custom tasks as needed. Custom tasks that you enable are displayed in project-level settings for all projects in Business Central.
-
To add a custom task, click Add Custom Task, browse to the relevant JAR file, and click the Upload icon. If a class implements a
WorkItemHandler, you can replace annotations with a .wid file by adding the file to Business Central separately.
Optional: To remove a custom task, click remove on the row of the custom task you want to remove and click Ok to confirm removal.
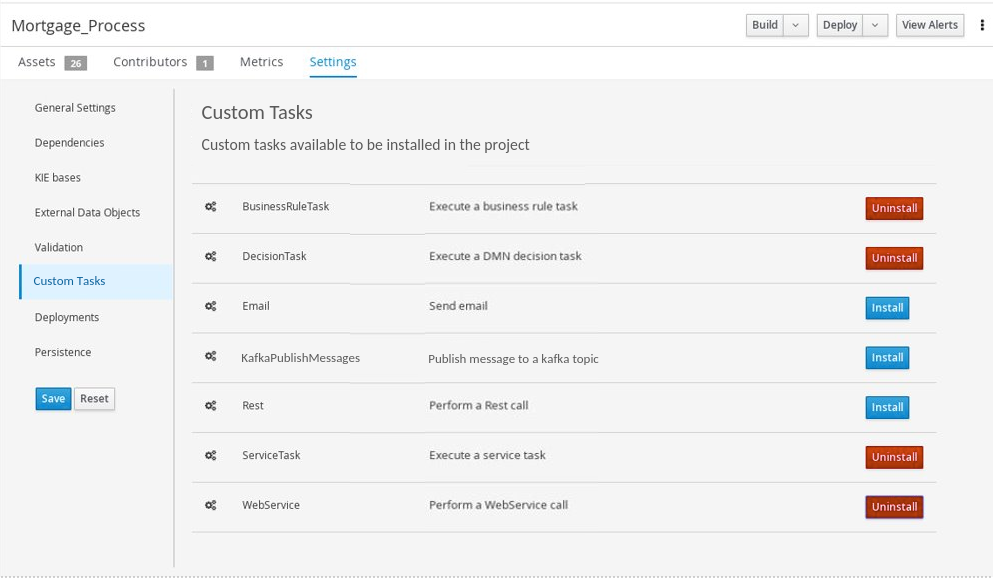
After you configure all required custom tasks, navigate to a project in Business Central and go to the project Settings → Custom Tasks page to view the available custom tasks that you enabled.
For each custom task, click Install to make the task available to the processes in that project or click Uninstall to exclude the task from the processes in the project.
If you are prompted for additional information when you install a custom task, enter the required information and click Install again.
The required parameters for the custom task depend on the type of task. For example, rule and decision tasks require artifact GAV information (Group ID, Artifact ID, Version), email tasks require host and port access information, and REST tasks require API credentials. Other custom tasks might not require any additional parameters.
-
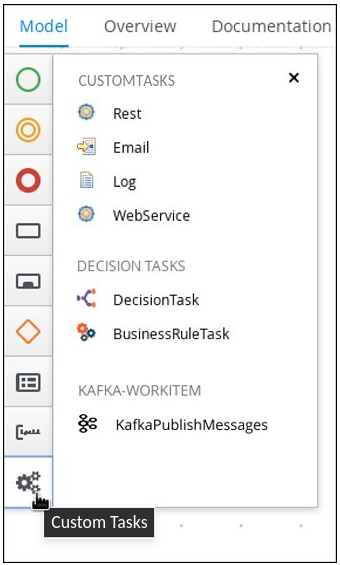
Click Save.
Return to the project page, select or add a business process in the project, and in the process designer palette, select the Custom Tasks option to view the available custom tasks that you enabled and installed:
30.7. User task administration
User tasks enable you to include human actions as input to the business processes that you create. User task administration provides methods to manipulate user and group task assignments, data handling, time-based automatic notifications, and reassignments.
The following user task operations are available in Business Central:
add/remove potential owners - by task id: Adds or removes users and groups using the task ID.
add/remove excluded owners - by task id: Adds or removes excluded owners using the task ID.
add/remove business administrators - by task id: Adds or removes business administrators using the task ID.
add task inputs - by task id: Provides a way to modify task input content after a task is created using the task ID.
remove task inputs - by task id: Removes task input variables using the task ID.
remove task output - by task id: Removes task output variables using the task ID.
schedules new reassignment to given users/groups after given time elapses - by task id: Schedules automatic reassignment based on the time expression and the state of the task:
reassign if not started: Used if the task was not moved to the InProgress state.
reassign if not completed: Used if the task was not moved to the Completed state.
schedules new email notification to given users/groups after given time elapses - by task id: Schedules automatic email notification based on the time expression and the state of the task:
notify if not started: Used if the task was not moved to the InProgress state.
notify if not completed: Used if the task was not moved to the Completed state.
list scheduled task notifications - by task id: Returns all active task notifications using the task ID.
list scheduled task reassignments - by task id: Returns all active tasks reassignments using the task ID.
cancel task notification - by task id and notification id: Cancels and unschedules task notification using the task ID.
cancel task reassignment - by task id and reassignment id: Cancels and unschedules task reassignment using the task ID.
30.8. Bulk actions on tasks
In the Tasks and Task Inbox pages in Business Central, you can perform bulk actions over multiple tasks in a single operation.
If a specified bulk action is not permitted based on the task status, a notification is displayed and the operation is not executed on that particular task.
30.8.1. Claiming tasks in bulk
After you create tasks in Business Central, you can claim the available tasks in bulk.
Procedure
In Business Central, complete one of the following steps:
To view the Task Inbox page, select Menu → Track → Task Inbox.
To view the Tasks page, select Menu → Manage → Tasks.
To claim the tasks in bulk, on the Task Inbox page or the Manage Tasks
page, select two or more tasks from the Task table.
From the Bulk Actions drop-down list, select Bulk Claim.
To confirm, click Claim on the Claim selected tasks window.
For each task selected, a notification is displayed showing the result.
30.8.2. Releasing tasks in bulk
You can release your owned tasks in bulk for others to claim.
Procedure
In Business Central, complete one of the following steps:
To view the Task Inbox page, select Menu → Track → Task Inbox.
To view the Tasks page, select Menu → Manage → Tasks.
To release the tasks in bulk, on the Task Inbox page or the Manage Tasks page, select two or more tasks from the Task table.
From the Bulk Actions drop-down list, select Bulk Release.
To confirm, click Release on the Release selected tasks window.
For each task selected, a notification is displayed showing the result.
30.8.3. Resuming tasks in bulk
If there are suspended tasks in Business Central, you can resume them in bulk.
Procedure
In Business Central, complete one of the following steps:
To view the Task Inbox page, select Menu → Track → Task Inbox.
To view the Tasks page, select Menu → Manage → Tasks.
To resume the tasks in bulk, on the Task Inbox page or the Manage Tasks page, select two or more tasks from the Task table.
From the Bulk Actions drop-down list, select Bulk Resume.
To confirm, click Resume on the Resume selected tasks window.
For each task selected, a notification is displayed showing the result.
30.8.4. Suspending tasks in bulk
After you create tasks in Business Central, you can suspend the tasks in bulk.
Procedure
In Business Central, complete one of the following steps:
To view the Task Inbox page, select Menu → Track → Task Inbox.
To view the Tasks page, select Menu → Manage → Tasks.
To suspend the tasks in bulk, on the Task Inbox page or the Manage Tasks page, select two or more tasks from the Task table.
From the Bulk Actions drop-down list, select Bulk Suspend.
To confirm, click Suspend on the Suspend selected tasks window.
For each task selected, a notification is displayed showing the result.
30.8.5. Reassigning tasks in bulk
After you create tasks in Business Central, you can reassign your tasks in bulk and delegate them to others.
Procedure
In Business Central, complete one of the following steps:
To view the Task Inbox page, select Menu → Track → Task Inbox.
To view the Tasks page, select Menu → Manage → Tasks.
To reassign the tasks in bulk, on the Task Inbox page or the Manage Tasks page, select two or more tasks from the Task table.
From the Bulk Actions drop-down list, select Bulk Reassign.
In the Tasks reassignment window, enter the user ID of the user to whom you want to reassign the tasks.
Click Delegate.
For each task selected, a notification is displayed showing the result.
Chapter 31. Execution error management
When an execution error occurs for a business process, the process stops and reverts to the most recent stable state (the closest safe point) and continues its execution. If an error of any kind is not handled by the process the entire transaction rolls back, leaving the process instance in the previous wait state. Any trace of this is only visible in the logs, and usually displayed to the caller who sent the request to the process engine.
Users with process administrator (process-admin) or administrator (admin) roles are able to access error messages in Business Central. Execution error messaging provides the following primary benefits:
Better traceability
Visibility in case of critical processes
Reporting and analytics based on error situations
External system error handling and compensation
Configurable error handling is responsible for receiving any technical errors thrown throughout the process engine execution (including task service). The following technical exceptions apply:
Anything that extends java.lang.Throwable
Process level error handling and any other exceptions not previously handled
There are several components that make up the error handling mechanism and allow a pluggable approach to extend its capabilities.
The process engine entry point for error handling is the ExecutionErrorManager. This is integrated with RuntimeManager, which is then responsible for providing it to the underlying KieSession and TaskService.
From an API point of view, ExecutionErrorManager provides access to the following components:
ExecutionErrorHandler: The primary mechanism for error handling
ExecutionErrorStorage: Pluggable storage for execution error information
31.1. Viewing process execution errors in Business Central
You can view process errors in two locations in Business Central:
Menu → Manage → Process Instances
Menu → Manage → Execution Errors
In the Manage Process Instances page, the Errors column displays the number of errors, if any, for the current process instance.
Prerequisites -
An error has occurred while running a process in Business Central.
Procedure -
In Business Central, go to Menu → Manage → Process Instances and hover over the number shown in the Errors column.
Click the number of errors shown in the Errors column to navigate to the Manage Execution Errors page.
The Manage Execution Errors page shows a list of errors for all process instances.
31.2. Managing execution errors
By definition, every process error that is detected and stored is unacknowledged and must be handled by someone or something (in case of automatic error recovery). Errors are filtered on the basis of whether or not they have been acknowledged. Acknowledging an error saves the user information and time stamp for traceability. You can access the Error Management view at any time.
Procedure -
In Business Central, go to Menu → Manage → Execution Errors.
Select an error from the list to open the Details tab. This displays information about the error or errors.
Click the Acknowledge button to acknowledge and clear the error. You can view the error later by selecting Yes on the Acknowledged filter in the Manage Execution Errors page.
If the error was related to a task, a Go to Task button is displayed.
Click the Go to Task button, if applicable, to view the associated job information in the Manage Tasks page.
In the Manage Tasks page, you can restart, reschedule, or retry the corresponding task.
For execution errors in Menu → Manage → Execution Errors, you can use the Filters and Advanced Filters panels to sort errors as needed.
You can filter execution errors by the following attributes in the Filters panel:
Filter by errors by type. You can select multiple type filters. Removing the status filter displays all processes, regardless of status.
The following filter states are available:
Process
Process Instance Id
Filter by process instance ID.
Input: Numeric
Job Id
Filter by job ID. The job id is created automatically when the job is created.
Input: Numeric
Filter by process instance ID.
Input: Numeric
Acknowledged
Filter errors that have been or have not been acknowledged.
Error Date
Filtering by the date or time that the error occurred.
This filter has the following quick filter options:
Last Hour
Today
Last 24 Hours
Last 7 Days
Last 30 Days
Custom
Selecting Custom date and time filtering opens a calendar tool for selecting a date and time range.
Chapter 32. Process instance migration
Process instance migration (PIM) is a standalone service containing a user interface and a back-end. It is packaged as a Thorntail uber-JAR. You can use the PIM service to define the migration between two different process definitions, known as a migration plan. The user can then apply the migration plan to the running process instance in a specific KIE Server.
For more information about the PIM service, see Process Instance Migration Service in KIE (Drools, OptaPlanner and jBPM ).
32.1. Installing the process instance migration service
You can use the process instance migration (PIM) service to create, export and execute migration plans. The PIM service is provided through a GitHub repository. To install the PIM service, clone the GitHub repository, then run the service and access it in a web browser.
Prerequisites -
You have defined processes in a backup-ed Red Hat Process Automation Manager development environment.
Procedure -
Download the
rhpam-7.11.0-add-ons.zip file from the Software Downloads page for Red Hat Process Automation Manager 7.11.
Unzip the downloaded archive.
Move the rhpam-7.11.0-process-migration-service-standalone.jar file from the add-ons archive to a desired location.
In the location, create a YAML file containing the kieserver and Thorntail configuration, for example:
thorntail:
deployment:
process-migration.war:
jaxrs:
application-path: /rest
login-config:
auth-method: BASIC
security-domain: pim
security-constraints:
- url-pattern: /*
roles: [ admin ]
- url-pattern: /health/*
datasources:
data-sources:
pimDS:
driver-name: h2
connection-url: jdbc:h2:mem:test;DB_CLOSE_DELAY=-1;DB_CLOSE_ON_EXIT=FALSE
user-name: DS_USERNAME
password: DS_PASSWORD
security:
security-domains:
classic-authentication:
login-modules:
UsersRoles:
code: UsersRoles
flag: required
module-options:
usersProperties: application-users.properties
rolesProperties: application-roles.properties
kieservers:
- host: http://localhost:8080/kie-server/services/rest/server
username: KIESERVER_USERNAME
password: KIESERVER_PASSWORD
- host: http://localhost:8280/kie-server/services/rest/server
username: KIESERVER_USERNAME
password: KIESERVER_PASSWORD1
Start the PIM service:
$ java -jar rhpam-7.11.0-process-migration-service-standalone.jar -s./config.yml
To enable auto-detection of a JDBC driver by Thorntail, add the JAR file of the JDBC driver name to the thorntail.classpath system property. For example:
$ java -Dthorntail.classpath=./h2-1.4.200.jar -jar rhpam-7.11.0-process-migration-service-standalone.jar -s ./config.yml
The h2 JDBC driver is included by default. You can use different JDBC drivers to connect to different external databases.
After the PIM service is up and running, enter http://localhost:8080 in a web browser.
32.2. Creating a migration plan
You can define the migration between two different process definitions, known as a migration plan, in the process instance migration (PIM) service web UI.
Prerequisites -
You have defined processes in a backup-ed Red Hat Process Automation Manager development environment.
The process instance migration service is running.
Procedure -
Enter
http://localhost:8080 in a web browser.
Log in to the PIM service.
In the upper right corner of the Process Instance Migration page, from the KIE Service list select the KIE Service you want to add a migration plan for.
Click Add Plan. The Add Migration Plan Wizard window opens.
In the Name field, enter a name for the migration plan.
Optional: In the Description field, enter a description for the migration plan.
Click Next.
In the Source ContainerID field, enter the source container ID.
In the Source ProcessId field, enter the source process ID.
Click Copy Source To Target.
In the Target ContainerID field, update the target container ID.
Click Retrieve Definition from backend and click Next.
From the Source Nodes list, select the source node you want to map.
From the Target Nodes list, select the target node you want to map.
If the Source Process Definition Diagram pane is not displayed, click Show Source Diagram.
If the Target Process Definition Diagram pane is not displayed, click Show Target Diagram.
Optional: To modify the view in the diagram panes, perform any of the following tasks:
To select text, select the
icon.
To pan, select the
icon.
To zoom in, select the
icon.
To zoom out, select the
icon.
To fit to viewer, select the
icon.
Click Map these two nodes.
Click Next.
Optional: To export as a JSON file, click Export.
In the Review & Submit tab, review the plan and click Submit Plan.
Optional: To export as a JSON file, click Export.
Review the response and click Close.
32.3. Editing a migration plan
You can edit a migration plan in the process instance migration (PIM) service web UI. You can modify the migration plan name, description, specified nodes, and process instances.
Prerequisites -
You have defined processes in a backup-ed Red Hat Process Automation Manager development environment.
The PIM service is running.
Procedure -
Enter
http://localhost:8080 in a web browser.
Log in to the PIM service.
On the Process Instance Migration page, select the Edit Migration Plan  icon on the row of the migration plan you want to edit. The Edit Migration Plan window opens.
On each tab, modify the details you want to change.
Click Next.
Optional: To export as a
icon on the row of the migration plan you want to edit. The Edit Migration Plan window opens.
On each tab, modify the details you want to change.
Click Next.
Optional: To export as a JSON file, click Export.
In the Review & Submit tab, review the plan and click Submit Plan.
Optional: To export as a JSON file, click Export.
Review the response and click Close.
32.4. Exporting a migration plan
You can export migration plans as a JSON file using the process instance migration (PIM) service web UI.
Prerequisites -
You have defined processes in a backup-ed Red Hat Process Automation Manager development environment.
The PIM service is running.
Procedure -
Enter
http://localhost:8080 in a web browser.
Log in to the PIM service.
On the Process Instance Migration page, select the Export Migration Plan  icon on the row of the migration plan you want to execute. The Export Migration Plan window opens.
Review and click Export.
icon on the row of the migration plan you want to execute. The Export Migration Plan window opens.
Review and click Export.
32.5. Executing a migration plan
You can execute the migration plan in the process instance migration (PIM) service web UI.
Prerequisites -
You have defined processes in a backup-ed Red Hat Process Automation Manager development environment.
The PIM service is running.
Procedure -
Enter
http://localhost:8080 in a web browser.
Log in to the PIM service.
On the Process Instance Migration page, select the Execute Migration Plan  icon on the row of the migration plan you want to execute. The Execute Migration Plan Wizard window opens.
From the migration plan table, select the check box on the row of each running process instance you want to migrate, and click Next.
In the Callback URL field, enter the callback URL.
To the right of Run migration, perform one of the following tasks:
To execute the migration immediately, select Now.
To schedule the migration, select Schedule and in the text field, enter the date and time, for example
icon on the row of the migration plan you want to execute. The Execute Migration Plan Wizard window opens.
From the migration plan table, select the check box on the row of each running process instance you want to migrate, and click Next.
In the Callback URL field, enter the callback URL.
To the right of Run migration, perform one of the following tasks:
To execute the migration immediately, select Now.
To schedule the migration, select Schedule and in the text field, enter the date and time, for example 06/20/2019 10:00 PM.
Click Next.
Optional: To export as a JSON file, click Export.
Click Execute Plan.
Optional: To export as a JSON file, click Export.
Check the response and click Close.
32.6. Deleting a migration plan
You can delete a migration plan in the process instance migration (PIM) service web UI.
Prerequisites -
You have defined processes in a backup-ed Red Hat Process Automation Manager development environment.
The PIM service is running.
Procedure -
Enter
http://localhost:8080 in a web browser.
Log in to the PIM service.
On the Process Instance Migration page, select the Delete  icon on the row of the migration plan you want to delete. The Delete Migration Plan window opens.
Click Delete to confirm deletion.
icon on the row of the migration plan you want to delete. The Delete Migration Plan window opens.
Click Delete to confirm deletion.
Part IV. Designing and building cases for case management
As a developer, you can use Business Central to configure Red Hat Process Automation Manager assets for case management.
Case management differs from Business Process Management (BPM). It focuses more on the actual data being handled throughout the case rather than on the sequence of steps taken to complete a goal. Case data is the most important piece of information in automated case handling, while business context and decision-making are in the hands of the human case worker.
Red Hat Process Automation Manager includes the IT_Orders sample project in Business Central. This document refers to the sample project to explain case management concepts and provide examples.
The Getting started with case management tutorial describes how to create and test a new IT_Orders project in Business Central. After reviewing the concepts in this guide, follow the procedures in the tutorial to ensure that you are able to successfully create, deploy, and test your own case project.
Chapter 33. Case management
Case management is an extension of Business Process Management (BPM) that enables you to manage adaptable business processes.
BPM is a management practice used to automate tasks that are repeatable and have a common pattern, with a focus on optimization by perfecting a process. Business processes are usually modeled with clearly defined paths leading to a business goal. This requires a lot of predictability, usually based on mass-production principles. However, many real-world applications cannot be described completely from start to finish (including all possible paths, deviations, and exceptions). Using a process-oriented approach in certain cases can lead to complex solutions that are hard to maintain.
Case management provides problem resolution for non-repeatable, unpredictable processes as opposed to the efficiency-oriented approach of BPM for routine, predictable tasks. It manages one-off situations when the process cannot be predicted in advance. A case definition usually consists of loosely coupled process fragments that can be connected directly or indirectly to lead to certain milestones and ultimately a business goal, while the process is managed dynamically in response to changes that occur during run time.
In Red Hat Process Automation Manager, case management includes the following core process engine features:
Case file instance
A per case runtime strategy
Case comments
Milestones
Stages
Ad hoc fragments
Dynamic tasks and processes
Case identifier (correlation key)
Case lifecycle (close, reopen, cancel, destroy)
A case definition is always an ad hoc process definition and does not require an explicit start node. The case definition is the main entry point for the business use case.
A process definition is introduced as a supporting construct of the case and can be invoked either as defined in the case definition or dynamically to bring in additional processing when required. A case definition defines the following new objects:
Activities (required)
Case file (required)
Milestones
Roles
Stages
Chapter 34. Case Management Model and Notation
You can use Business Central to import, view, and modify the content of Case Management Model and Notation (CMMN) files. When authoring a project, you can import your case management model and then select it from the asset list to view or modify it in a standard XML editor.
The following CMMN constructs are currently available:
Tasks (human task, process task, decision task, case task)
Discretionary tasks (same as above)
Stages
Milestones
Case file items
Sentries (entry and exit)
The following tasks are not supported:
Required
Repeat
Manual activation
Sentries for individual tasks are limited to entry criteria while entry and exit criteria are supported for stages and milestones. Decision tasks map by default to a DMN decision. Event listeners are not supported.
Red Hat Process Automation Manager does not provide any modeling capabilities for CMMN and focuses solely on the execution of the model.
A case instance is a single instance of a case definition and encapsulates the business context. All case instance data is stored in the case file, which is accessible to all process instances that might participate in the particular case instance. Each case instance and its case file are completely isolated from the other cases. Only users assigned to a required case role can access the case file.
A case file is used in case management as a repository of data for the entire case instance. It contains all roles, data objects, the data map, and any other data. The case can be closed and reopened at a later date with the same case file attached. A case instance can be closed at any time and does not require a specific resolution to be completed.
The case file can also include embedded documentation, references, PDF attachments, web links, and other options.
35.1. Configuring case ID prefixes
The caseId parameter is a string value that is the identifier of the case instance. You can configure the Case ID Prefix in Red Hat Process Automation Manager designer to distinguish different types of cases.
The following procedures uses the IT_Orders sample project to demonstrate how to create unique case ID prefixes for specific business needs.
Prerequisites -
The IT_Orders sample project is open in Business Central.
Procedure -
In Business Central, go to Menu → Design → Projects. If there are existing projects, you can access the samples by clicking the MySpace default space and selecting Try Samples from the Add Project drop-down menu. If there are no existing projects, click Try samples.
Select IT_Orders and click Ok.
In the Assets window, click the orderhardware business process to open the designer.
Click on an empty space on the canvas and in the upper-right corner, click the Properties
 icon.
Scroll down and expand Case Management.
In the Case ID Prefix field, enter an ID value. The ID format is internally defined as
icon.
Scroll down and expand Case Management.
In the Case ID Prefix field, enter an ID value. The ID format is internally defined as ID-XXXXXXXXXX, where XXXXXXXXXX is a generated number that provides a unique ID for the case instance.
If a prefix is not provided, the default prefix is CASE with the following identifiers:
CASE-0000000001
CASE-0000000002
CASE-0000000003
You can specify any prefix. For example, if you specify the prefix IT, the following identifiers are generated:
IT-0000000001
IT-0000000002
IT-0000000003
35.2. Configuring case ID expressions
The following procedures uses the IT_Orders sample project to demonstrate how set metadata attribute keys to customize expressions for generating the caseId.
Prerequisites -
The IT_Orders sample project is open in Business Central.
Procedure -
In Business Central, go to Menu → Design → Projects. If there are existing projects, you can access the samples by clicking the MySpace default space and selecting Try Samples from the Add Project drop-down menu. If there are no existing projects, click Try samples.
Select IT_Orders and click Ok.
In the Assets window, click the orderhardware business process to open the designer.
Click on an empty space on the canvas and in the upper-right corner, click the Properties
icon.
Expand the Advanced menu to access the Metadata Attributes fields.
Specify one of the following functions for the
customCaseIdPrefix metadata attribute:
LPAD: Left padding
RPAD: Right padding
TRUNCATE: Truncate
UPPER: Upper case
In this example, type is a variable set in the Case File Variables field, which during runtime a user may define to it the value type1. UPPER is a pre-built function to uppercase a variable, and IT- is a static prefix. The results are dynamic case IDs such as IT-TYPE1-0000000001, IT-TYPE1-0000000002, and IT-TYPE1-0000000003.
If the customCaseIdPrefixIsSequence case metadata attribute is set to false (default value is true), the case instance will not create any sequence and the caseIdPrefix expression is the case ID. For example, if generating case IDs based on social security numbers, no specific sequence or instance identifiers are required.
The customCaseIdPrefixIsSequence metadata attribute is optionally added and set to false (default value is true) to disable the numeric sequences for the case IDs. This is useful if an expression used for custom case IDs already contains a case file variable to express unique business identifiers instead of the generic sequence values. For example, if generating case IDs based on social security numbers, no specific sequence or instance identifiers are required. For the example below, SOCIAL_SECURITY_NUMBER is also a variable declared as a case file variable.
The IS_PREFIX_SEQUENCE case file variable is optionally added as a flag during runtime to disable or enable the sequence generation for case IDs. For example, there is no need to create a sequence suffix for medical insurance coverage for an individual. For a multi-family insurance policy, the company might set the IS_PREFIX_SEQUENCE case variable to true to aggregate a sequence number for each member of the family.
The result of using the customCaseIdPrefixIsSequence metadata attribute statically as false or using the IS_PREFIX_SEQUENCE case file variable and setting during runtime for it the value false, is the same.
Subcases provide the flexibility to compose complex cases that consist of other cases. This means that you can split large and complex cases into multiple layers of abstraction and even multiple case projects. This is similar to splitting a process into multiple sub-processes.
A subcase is another case definition that is invoked from within another case instance or a regular process instance. It has all of the capabilities of a regular case instance:
It has a dedicated case file.
It is isolated from any other case instance.
It has its own set of case roles.
It has its own case prefix.
You can use the process designer to add subcases to your case definition. A subcase is a case within your case project, similar to having a sub-process within your process. Subcases can also be added to a regular business process. Doing this enables you to start a case from within a process instance.
For more information about adding a subcase to your case definition, see Getting started with case management.
The Sub Case Data I/O window supports the following set of input parameters that enable you to configure and start the subcase:
- Independent
-
Optional indicator that tells the process engine whether or not the case instance is independent. If it is independent, the main case instance does not wait for its completion. The value of this property is
false by default.
- GroupRole_XXX
-
Optional group to case role mapping. The role names belonging to this case instance can be referenced here, meaning that participants of the main case can be mapped to participants of the subcase. This means that the group assigned to the main case is automatically assigned to the subcase, where
XXX is the role name and the value of the property is the value of the group role assignment.
- DataAccess_XXX
-
Optional data access restrictions where
XXX is the name of the data item and the value of the property is the access restrictions.
- DestroyOnAbort
-
Optional indicator that tells the process engine whether to cancel or destroy the subcase when the subcase activity is aborted. The default value is
true.
- UserRole_XXX
-
Optional user to case role mapping. You can reference the case instance role names here, meaning that an owner of the main case can be mapped to an owner of the subcase. The person assigned to the main case is automatically assigned to the subcase, where
XXX is the role name and the value of the property is the value of the user role assignment.
- Data_XXX
-
Optional data mapping from this case instance or business process to a subcase, where
XXX is the name of the data in the subcase being targeted. This parameter can be provided as many times as needed.
- DeploymentId
-
Optional deployment ID (or container ID in the context of KIE Server) that indicates where the targeted case definition is located.
- CaseDefinitionId
-
The mandatory case definition ID to be started.
- CaseId
-
The case instance ID of the subcase after it is started.
Chapter 37. Ad hoc and dynamic tasks
You can use case management to carry out tasks ad hoc, rather than following a strict end-to-end process. You can also add tasks to a case dynamically during run time.
Ad hoc tasks are defined in the case modeling phase. Ad hoc tasks that are not configured as AdHoc Autostart are optional and might not be used during a case. Therefore, they must be triggered by a signal event or by a Java API.
Dynamic tasks are defined during the case execution and are not present in the case definition model. Dynamic tasks address specific needs that arise during the case. They can be added to the case and worked on at any time using a case application, as demonstrated in the Red Hat Process Automation Manager Showcase application. Dynamic tasks can also be added by Java and Remote API calls.
Dynamic tasks can be user or service activities, while ad hoc tasks can be any type of task. For more information about task types, see "BPMN2 tasks in process designer" in Designing business processes using BPMN models.
Dynamic processes are any reusable sub-process from a case project.
Ad hoc nodes with no incoming connections are configured in the node’s AdHoc Autostart property and are triggered automatically when the case instance is started.
Ad hoc tasks are optional tasks that are configured in a case definition. Because they are ad hoc, they must be triggered in some way, usually by a signal event or Java API call.
Chapter 38. Adding dynamic tasks and processes to a case using the KIE Server REST API
You can add dynamic tasks and processes to a case during run time to address unforeseen changes that can occur during the lifecycle of a case. Dynamic activities are not defined in the case definition and therefore they cannot be signaled the way that a defined ad hoc task or process can.
You can add the following dynamic activities to a case:
User tasks
Service tasks (any type that is implemented as a work item)
Reusable sub-processes
Dynamic user and service tasks are added to a case instance and immediately executed. Depending on the nature of a dynamic task, it might start and wait for completion (user task) or directly complete after execution (service task). For dynamic sub-processes, the process engine requires a KJAR containing the process definition for that dynamic process to locate the process by its ID and execute it. This sub-process belongs to the case and has access to all of the data in the case file.
You can use the Swagger REST API application to create dynamic tasks and sub-processes.
Procedure
In a web browser, open the following URL:
http://localhost:8080/kie-server/docs
Open the list of available endpoints under Case instances :: Case Management.
Locate the POST method endpoints for creating dynamic activities.
POST /server/containers/{id}/cases/instances/{caseId}/tasks
Adds a dynamic task (user or service depending on the payload) to the case instance.
POST /server/containers/{id}/cases/instances/{caseId}/stages/{caseStageId}/tasks
Adds a dynamic task (user or service depending on the payload) to specific stage within the case instance.
POST /server/containers/{id}/cases/instances/{caseId}/processes/{pId}
Adds a dynamic sub-process identified by the process ID to case instance.
POST /server/containers/{id}/cases/instances/{caseId}/stages/{caseStageId}/processes/{pId}
Adds a dynamic sub-process identified by process ID to stage within a case instance.
To open the Swagger UI, click the REST endpoint required to create the dynamic task or process.
Click Try it out and enter the parameters and body required to create the dynamic activity.
Click Execute to create the dynamic task or sub-process using the REST API.
38.1. Creating a dynamic user task using the KIE Server REST API
You can create a dynamic user task during case run time using the REST API. To create a dynamic user task, you must provide the following information:
Task name
Task subject (optional, but recommended)
Actors or groups (or both)
Input data
Use the following procedure to create a dynamic user task for the IT_Orders sample project available in Business Central using the Swagger REST API tool. The same endpoint can be used for REST API without Swagger.
Procedure
In a web browser, open the following URL:
http://localhost:8080/kie-server/docs.
Open the list of available endpoints under Case instances :: Case Management.
Click click the following POST method endpoint to open the details:
/server/containers/{id}/cases/instances/{caseId}/tasks
Click Try it out and then input the following parameters:
Table 38.1. Parameters| Name | Description |
|---|
|
itorders
caseId
IT-0000000001
|
38.2. Creating a dynamic service task using the KIE Server REST API
Service tasks are usually less complex than user tasks, although they might need more data to execute properly. Service tasks require the following information:
name: The name of the activity
nodeType: The type of node that will be used to find the work item handler
data: The map of the data to properly deal with execution
During case run time, you can create a dynamic service task with the same endpoint as a user task, but with a different body payload.
Use the following procedure using the Swagger REST API to create a dynamic service task for the IT_Orders sample project available in Business Central. You can use the same endpoint for REST API without Swagger.
Procedure
In a web browser, open the following URL:
http://localhost:8080/kie-server/docs
Open the list of available endpoints under Case instances :: Case Management.
Click the following POST method endpoint to open the details:
/server/containers/{id}/cases/instances/{caseId}/stages/{caseStageId}/tasks
Click Try it out and then enter the following parameters:
Table 38.2. Parameters| Name | Description |
|---|
|
itorders
caseId
IT-0000000001
|
38.3. Creating a dynamic sub-process using the KIE Server REST API
When creating a dynamic sub-process, only optional data is provided. There are no special parameters as there are when creating dynamic tasks.
The following procedure describes how to use the Swagger REST API to create a dynamic sub-process task for the IT_Orders sample project available in Business Central. The same endpoint can be used for REST API without Swagger.
Procedure
In a web browser, open the following URL:
http://localhost:8080/kie-server/docs.
Open the list of available endpoints under Case instances :: Case Management.
Click the following POST method endpoint to open the details:
/server/containers/{id}/cases/instances/{caseId}/processes/{pId}
Click Try it out and enter the following parameters:
Table 38.3. Parameters| Name | Description |
|---|
|
itorders
caseId
IT-0000000001
itorders-data.place-order
The pId is the process ID of the sub-process to be created.
|
| |