一、前言
大型中后台项目一般包括10个以上的子项目,如果维护在一个单页面应用中,项目就会越来越大,而且不利于版本的迭代,微前端就很好的解决了这些问题。
这篇文章主要来体验下蚂蚁的微前端:qiankun,虽然比较成熟了,但在体验过程中还是有一些问题,记录总结下,
项目代码
实践项目以react单页面应用为主应用,然后构建了三个微应用:react、vue3、node静态页面
二、前期准备
微前端要求多个前端服务,所以我们先准备几个应用,使用不同的技术栈,体验微前端的强大
1、项目架构
mirco-front-demo
作为整个服务的根目录,为了便于实践,主应用和微应用将放在一起。
主应用:
-
my-app
-
port: 10000
-
create-react-app
微应用:
-
micro-reat-1
-
port: 10100
-
create-react-app
-
micro-vue-2
-
micro-static-3
2、主应用my-app
需要提前安装create-react-app:
sudo npx install create-react-app
通过
create-react-app
创建主应用
my-app
,其他的微应用都会挂载到主应用。
# 在根目录 mkdir mirco-front-demo cd mirco-front-demo # 新建主应用my-app npx create-react-app my-app cd my-app # 通过.env文件修改启动端口 echo "PORT=10000" > .env yarn start 复制代码
3、微应用micro-react-1
cd micro-front-demo npx create-react-app micro-react-1 复制代码
同主应用一样创建一个React应用,命名
micro-react-1
,并修改启动端口号(也可以使用.env文件修改)
修改启动端口号:
{ "scripts": { "start": "PORT=10100 react-app-rewired start", "build": "react-app-rewired build", "test": "react-app-rewired test", "eject": "react-app-rewired eject" } } 复制代码
4、微应用micro-vue-2
使用vue3.0,提前安装vue-cli:
yarn global add @vue/cli
,
官方文档
vue create micro-vue-2 cd micro-vue-2 touch vue.config.js 复制代码
除了微应用1和微应用2修改启动端口号的方法,这里也可以对webpack进行覆盖
vue-config.js
const { defineConfig } = require('@vue/cli-service') module.exports = defineConfig({ transpileDependencies: true, devServer: { // 监听端口 port: 10200, // 配置跨域请求头,解决开发环境的跨域问题 headers: { "Access-Control-Allow-Origin": "*", } } } 复制代码
启动微应用
yarn serve
5、微应用micro-static-3
# 新建微应用项目3 mkdir micro-static-3 cd micro-static-3 npm init yarn add express cors # 新建项目文件 mkdir static touch index.js cd static touch index.html 复制代码
index.js
const express = require('express') const cors = require('cors') const app = express() const port = 10300 app.use(cors()) app.use(express.static('static')); app.listen(port, () => { console.log(`Example app listening on port ${port}`) }) 复制代码
启动微应用
node index.js
6、同时启动微应用
cd mirco-front-demo npm init yarn add npm-run-all -D 复制代码
修改当前目录下
package.json
{ "scripts": { "test": "echo \"Error: no test specified\" && exit 1", "start": "npm-run-all --parallel start:*", "start:main": "cd my-app && yarn start", "start:micro-react": "cd micro-react-1 && yarn start", "start:micro-vue": "cd micro-vue-2 && yarn serve", "start:micro-static": "cd micro-static-3 && node index.js" } } 复制代码
执行命令
cd micro-front-demo yarn start 复制代码
这样就同时启动了四个前端服务
三、配置qiankun
1、主应用路由和样式
改造下主应用样式,整个顶部导航栏和侧边栏属于主应用,而中间空白的部分可以展示主应用或子应用的页面。
主应用路由安装
react-router-dom
,通过
history
模式渲染。

在侧边栏点击不同的链接会加载不同的子应用,样式和路由具体可以看
示例代码
2、注册微应用
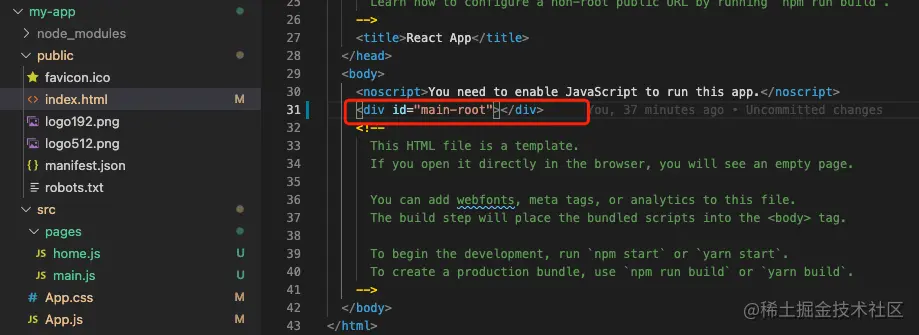
修改单页面应用渲染根节点
root
为
main-root
,防止和微应用中渲染节点冲突。

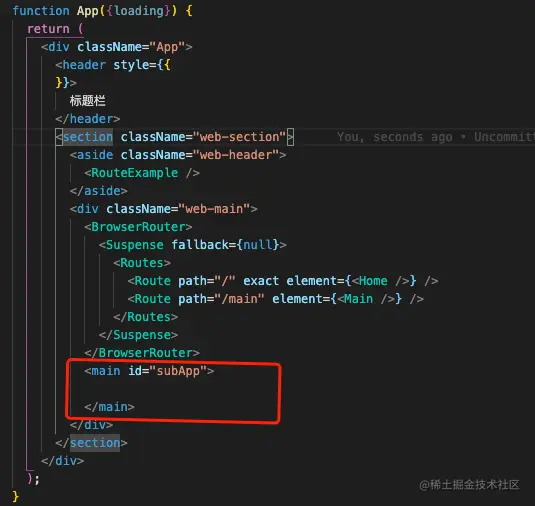
并且增加一个通过id标记的DIV,用来嵌入微应用,接着引入
qiankun
,这里
id=subApp
用来挂载微应用
yarn add qiankun 复制代码

在
src/index.js
中配置
import React from 'react'; import ReactDOM from 'react-dom'; import { registerMicroApps, start } from 'qiankun'; import './index.css'; import App from './App'; function render(){ ReactDOM.render(<App />, document.querySelector('#main-root')); } render({}); registerMicroApps([ { name: 'react', // app name registered entry: '//localhost:10100', container: "#subApp", activeRule: '/react' }, { name: 'vue', // app name registered entry: '//localhost:10200', container: "#subApp", activeRule: '/vue' }, { name: 'static', // app name registered entry: '//localhost:10300', container: "#subApp", activeRule: '/static' } ], { beforeLoad: app => { console.log('before load app.name=====>>>>>', app.name) }, beforeMount: [ app => { console.log('[LifeCycle] before mount %c%s', 'color: green;', app.name) } ], afterMount: [ app => { console.log('[LifeCycle] after mount %c%s', 'color: green;', app.name) } ], afterUnmount: [ app => { console.log('[LifeCycle] after unmount %c%s', 'color: green;', app.name) } ] }) start() 复制代码
3、微应用配置
1) micro-react-1
引入
react-router-dom
给微应用配置路由,展示不同的页面,如下:

修改
src/index.js
下启动文件
function render(props) { const { container } = props; ReactDOM.render(<App />, container ? container.querySelector('#root') : document.querySelector('#root')); } if (!window.__POWERED_BY_QIANKUN__) { render({}); } export async function bootstrap() { console.log('[react16] react app bootstraped'); } export async function mount(props) { console.log('[react16] props from main framework', props); render(props); } export async function unmount(props) { const { container } = props; ReactDOM.unmountComponentAtNode(container ? container.querySelector('#root') : document.querySelector('#root')); } 复制代码
给微应用添加导出声明周期函数,微应用挂载成功时,渲染到当前应用的root节点。
当前cra并没有释放webpack配置,所以要通过插件覆盖配置:
yarn add react-app-rewired -D 复制代码
"scripts": { "start": "PORT=10100 react-app-rewired start", "build": "react-app-rewired build", "test": "react-app-rewired test", "eject": "react-app-rewired eject" } 复制代码
在当前微应用根目录下
touch config-overrides.js
const { name } = require('./package'); module.exports = { webpack: (config, env) => { config.output.library = `${name}-[name]`; config.output.libraryTarget = 'umd'; config.output.globalObject = 'window'; config.output.chunkLoadingGlobal = `webpackJsonp_${name}`; return config; }, devServer: (_) => { const config = _; config.headers = { 'Access-Control-Allow-Origin': '*', }; config.historyApiFallback = true; config.hot = false; config.watchContentBase = false; config.liveReload = false; config.injectClient = false return config; } } 复制代码
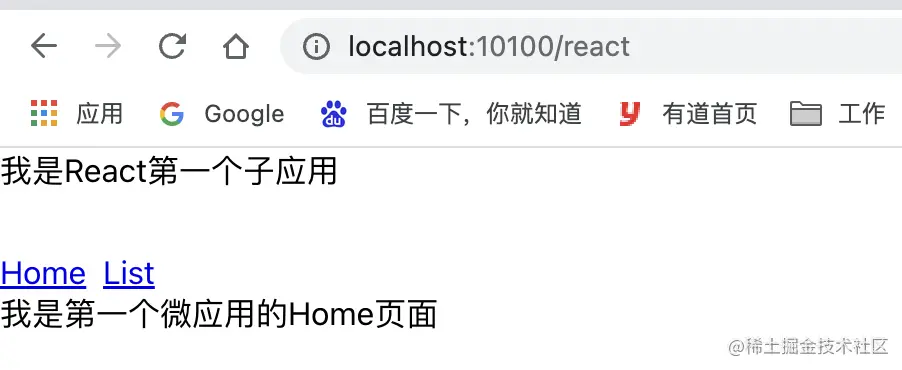
启动微应用
yarn start
,正常运行
2) micro-vue-2
新增
public-path.js
文件,用于修改运行时的
publicPath
src/public-path.js
if (window.__POWERED_BY_QIANKUN__) { __webpack_public_path__ = window.__INJECTED_PUBLIC_PATH_BY_QIANKUN__; } 复制代码
引入vue路由,设置成history模式,baseRouter设置成vue,导出声明周期函数
import { createApp } from 'vue' import App from './App.vue' import router from './router' import './public-path' const app = createApp(App); function render(props) { const { container } = props; app.use(router) .mount(container ? container.querySelector('#app') : '#app') } export async function bootstrap() { console.log('bootstrap'); } export async function mount(props) { console.log('mount', props); render(props); } export async function unmount() { console.log('unmount'); app.unmount(); } 复制代码
修改webpack配置
vue.config.js
module.exports = defineConfig({ configureWebpack: { output: { // 微应用的包名,这里与主应用中注册的微应用名称一致 library: name, // 将你的 library 暴露为所有的模块定义下都可运行的方式 libraryTarget: "umd", // 按需加载相关,设置为 webpackJsonp_微应用名称 即可 chunkLoadingGlobal: `webpackJsonp_${name}`, } } }) 复制代码
启动应用
yarn serve
3) micro-static-3
这是一个express服务启动的静态服务
文件入口导出声明周期
entry.js
const render = ($) => { $('#app').html('Hello, render html, 一个通过http服务部署的静态网站'); return Promise.resolve(); }; ((global) => { global['static'] = { bootstrap: () => { console.log('purehtml bootstrap'); return Promise.resolve(); }, mount: () => { console.log('purehtml mount'); return render($); }, unmount: () => { console.log('purehtml unmount'); return Promise.resolve(); }, }; })(window); 复制代码
然后在模版文件导入

其实也是挂载在了app节点。
启动当前微服务
node index.js
4、启动所有应用
cd micro-front-demo yarn start 复制代码
四、报错处理
1、报错信息
'__webpack_public_path__' is not defined
Uncaught Error: single-spa minified message #20
覆盖CRA的Webpack配置
const { name } = require('./package'); module.exports = { webpack: (config) => { config.output.library = `${name}-[name]`; config.output.libraryTarget = 'umd'; config.output.jsonpFunction = `webpackJsonp_${name}`; config.output.globalObject = 'window'; return config; }, devServer: (_) => { const config = _; config.headers = { 'Access-Control-Allow-Origin': '*', }; config.historyApiFallback = true; config.hot = false; config.watchContentBase = false; config.liveReload = false; return config; }, }; 复制代码
这里报错,是因为是webpack5.x不兼容
config.output.jsonpFunction
的写法,需要替换成
config.output.chunkLoadingGlobal
2、报错信息
construct.js:17 Uncaught Error: application 'react' died in status LOADING_SOURCE_CODE: [qiankun]: You need to export lifecycle functions in react entry
没有将生命周期暴露出来,需要挨个检查下面的配置
Invalid configuration object. Webpack has been initialized using a configuration object that does not match the API schema. - configuration.output has an unknown property 'jsonpFunction'. These properties are valid: object { assetModuleFilename?, asyncChunks?, auxiliaryComment?, charset?, chunkFilename?, chunkFormat?, chunkLoadTimeout?, chunkLoading?, chunkLoadingGlobal?, clean?, compareBeforeEmit?, crossOriginLoading?, cssChunkFilename?, cssFilename?, devtoolFallbackModuleFilenameTemplate?, devtoolModuleFilenameTemplate?, devtoolNamespace?, enabledChunkLoadingTypes?, enabledLibraryTypes?, enabledWasmLoadingTypes?, environment?, filename?, globalObject?, hashDigest?, hashDigestLength?, hashFunction?, hashSalt?, hotUpdateChunkFilename?, hotUpdateGlobal?, hotUpdateMainFilename?, iife?, importFunctionName?, importMetaName?, library?, libraryExport?, libraryTarget?, module?, path?, pathinfo?, publicPath?, scriptType?, sourceMapFilename?, sourcePrefix?, strictModuleErrorHandling?, strictModuleExceptionHandling?, trustedTypes?, umdNamedDefine?, uniqueName?, wasmLoading?, webassemblyModuleFilename?, workerChunkLoading?, workerWasmLoading? } -> Options affecting the output of the compilation. `output` options tell webpack how to write the compiled files to disk. Did you mean output.chunkLoadingGlobal (BREAKING CHANGE since webpack 5)?
作者:前端中后台
链接:https://juejin.cn/post/7075607657205710855
来源:稀土掘金
著作权归作者所有。商业转载请联系作者获得授权,非商业转载请注明出处。