

Android矢量图动画:每人送一辆掘金牌小黄车

看完本文,每人送一台小黄车,掘金牌的~
不得不说,矢量图在项目中用得少之又少,却很香!可缩放矢量图形(SVG)是一套语法规范,常在前端中使用,而VectorDrawable(Android中的矢量图)只实现了SVG的部分语法。使用
VectorDrawable
代替位图可以减小 APK 的大小,因为可以针对不同的屏幕密度调整同一文件的大小,而不会降低图片质量,同时可以实现一些复制的效果图。
可以从下面两个地方获得常用矢量图:
- IconFont
-
Android Stuido 自带的
Vector Asset Studio工具
「Android版本兼容问题」
相信由于兼容低版本问题,导致矢量图得不到推广吧?但是现在大多数手机系统都Android 5.0起步了吧。
矢量图
VectorDrawable
仅支持到Android 4.4,通过支持库可最低支持到Android 2.1。
矢量图动画
AnimatedVectorDrawable
仅支持到Android 5.0,通过支持库最低支持到Android 3.0。
「Gralde配置」
    android {
      defaultConfig {
        vectorDrawables.useSupportLibrary = true
    dependencies {
      //需要 Android 支持库 23.2 或更高版本以及 Android Plugin for Gradle 2.0 或更高版本
      implementation 'com.android.support:appcompat-v7:23.2.0'
「美图减压鉴赏:」

矢量图
通过Android Studio的
Vector Asset Studio
工具来获取一张矢量图。

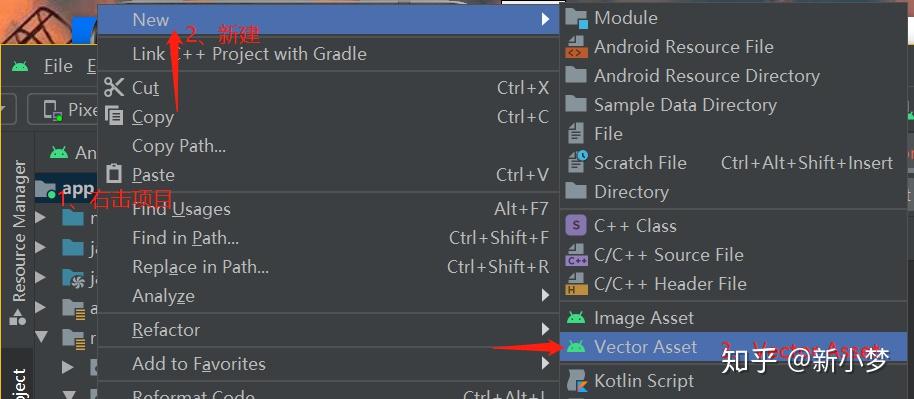
根据个人喜好配置Vector Assert。

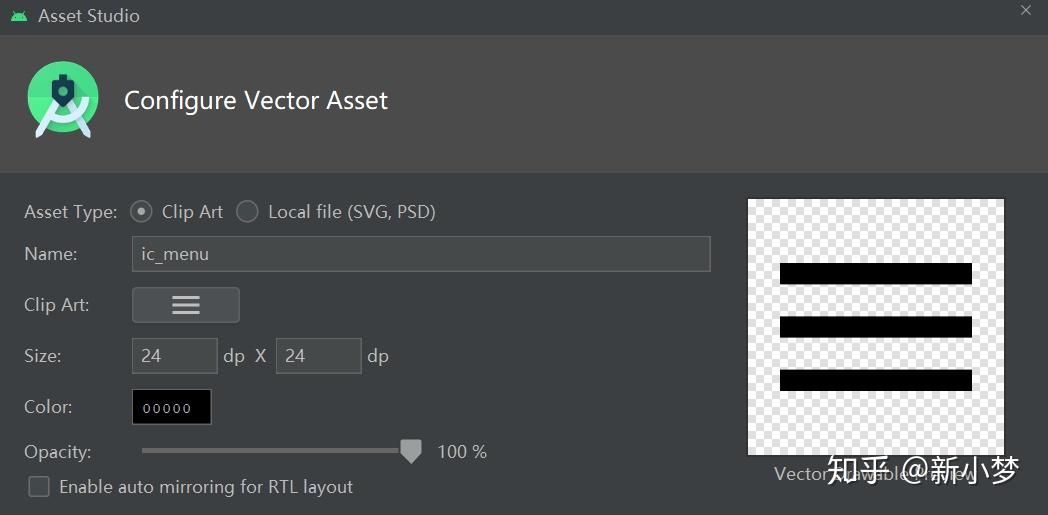
然后在drawable文件夹生成资源文件,例如这里生成
ic_menu.xml
文件:
<vector xmlns:android="http://schemas.android.com/apk/res/android"
    android:width="24dp"
    android:height="24dp"
    android:viewportWidth="24"
    android:viewportHeight="24"
    android:tint="?attr/colorControlNormal">
      android:fillColor="@android:color/white"
      android:pathData="M3,18h18v-2L3,16v2zM3,13h18v-2L3,11v2zM3,6v2h18L21,6L3,6z"/>
</vector>
没了解过矢量图,相信是看不懂
path
标签内容的。
在
vector
标签设置矢量图大小,
width
和
height
属性分别为
24dp
。
viewportWidth
和
viewportHeight
属性表示画布的大小,理解为矢量图等分的份数,这里划分为24*24。可以理解在一张24dp*24dp的图片上有24*24个小方格,通过这些小方格,可以绘制不同图案。
path
可以理解为路径,在图片绘制的内容。
fillColor
属性表示填充颜色,
pathData
属性表示在图片上作画内容。

pathData
属性的值是有特殊的含义的,通过下面的SVG命令知识点,就可以看懂并实践
pathData
了。
常用命令:
-
「M x,y」
移动到坐标(x,y)。M3,18表示将画笔移动到坐标(3,18)
-
「L x,y」
从当前的位置画一条直线到指定的位置(x,y)。
-
「H x」
画水平线到x位置。
-
「V y」
画垂直线到y位置。
-
「Z」
闭合,连接终点和起点
-
「A rx,ry,xRotationAnagle,radianFlag,sweepFlag,x,y」
画弧线,理解为椭圆的一部分,
rx和ry表示 x轴和y轴半径,即椭圆的长短轴问题;xRotationAnagle表示x轴旋转角度(搞不明白用法);radianFlag0表示取小弧度,1表示取大弧度;sweepFlag0表示逆时针,表示1顺时针画弧线;x和y弧闲的终点位置,起点位置为画笔所在的地方。
-
「C x1,y1,x2,y2,x3,y3」
三次贝赛曲线
-
「S x2,y2,x,y」
光滑三次贝塞尔曲线
-
「Q x1,y1,x2,y2」
二次贝赛曲线
-
「T x,y」
映射
ps:大写表示绝对坐标,小写表示相对坐标。
对
pathData
标签内容进行解读:
<vector xmlns:android="http://schemas.android.com/apk/res/android"
    android:width="24dp"
    android:height="24dp"
    android:viewportWidth="24"
    android:viewportHeight="24"
    android:tint="?attr/colorControlNormal">
      android:fillColor="@android:color/white"
      android:pathData="M3,18 h18 v-2 L3,16 v2 z M3,13 h18 v-2 L3,11 v2 z M3,6 v2 h18 L21,6 L3,6 z"/>
</vector>
M3,18
将画笔移动到坐标
(3,18)
;
h18
从坐标
(3,18)
到坐标
(21,18)
画一条水平直线;
v-2
从坐标
(21,18)
到坐标
(21,16)
画一条垂直直线;
L3,16
从坐标
(21,18)
到坐标
(3,16)
画一条直线;
v2
从坐标
(3,16)
到坐标
(3,18)
画一条垂直直线;
z
闭合起点和终点。
到这里,最底部的直线就会画出来了,其他两条线是相同原理。

既然分析
pathData
属性,那就从里到外分析VectorDrawable的xml布局文件形成。
「注意事项」
:不要将pathData的值抽离出来放到
string.xml
文件,不然在兼容5.0以下机型生成png图片,会报pathData错误。
path
标签
path
标签可用属性:
-
name:路径名称,可在其他地方引用,例如矢量图动画引用; -
strokeWidth:线条宽度,单位为viewportHeight或viewportWidth中的1等分;。 -
strokeColor:线条颜色; -
strokeAlpha:线条透明度。0f->1f; -
strokeLineJoin:线条拐角的形状。圆角round、斜切尖角miter、斜角bevel,例如正方形的四个角; -
strokeLineCap:线条线帽形状。圆角round、正方形square、臂butt; -
strokeMiterLimit:斜线miter与strokeWidth的比例上限。如果比例值超过这个值,不再显示尖角而是bevel斜角。当strokeLineJoin属性设置为miter才生效。

-
fillColor:填充颜色; -
fillType:填充类型,取值nonZero、evenOdd; -
fillAlpha:填充透明度; -
trimPathStart:从路径开始位置剪掉比率的内容,留下剩下的,0f->1f; -
trimPathEnd:从路径开始位置截取比率的内容,留下截取的内容,0f->1f; -
trimPathOffset:trimPathStart或trimPathEnd的偏移量0f->1f;
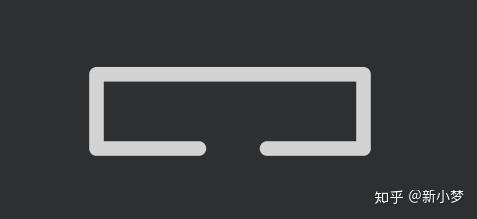
例如:
XML布局如下:
<vector xmlns:android="http://schemas.android.com/apk/res/android"
    android:width="24dp"
    android:height="24dp"
    android:viewportWidth="24"
    android:viewportHeight="24">
        android:name="triangle"
        android:pathData="M3,18 h18 v-5 L3,13 v5 z "
        android:strokeWidth="1"
        android:strokeLineJoin="round"
        android:strokeAlpha="0.9"
        android:strokeColor="@color/white"
        android:trimPathStart="0.1"
        android:strokeLineCap="round"
        android:trimPathOffset="0.15"
</vector>
PreView效果如下:

group
标签
group
标签主要是将多个
path
标签组合起来,子标签也可以是
group
标签,其属性作用于所有子标签,有以下属性:
-
name: 定义group标签名称; -
translateX: x轴位移; -
translateY: y轴位移; -
rotation: 旋转; -
scaleX: x轴缩放; -
scaleY: y轴缩放; -
pivotX: 缩放与旋转参考点X; -
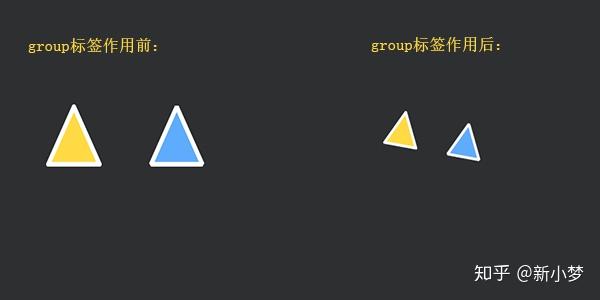
pivotY: 缩放与旋转参考点y; 栗子:
XML布局代码:
<vector xmlns:android="http://schemas.android.com/apk/res/android"
    android:width="24dp"
    android:height="24dp"
    android:viewportWidth="24"
    android:viewportHeight="24">
    <group
        android:name="triangleGroup"
        android:rotation="10"
        android:translateX="1"
        android:translateY="1"
        android:scaleX="0.5f"
        android:scaleY="0.5f"
        android:pivotX="0.5"
        android:pivotY="0.5">
            android:fillColor="@color/colorPrimary"
            android:pathData="M6,6 L9,12 H3 z"
            android:strokeWidth="0.5"
            android:strokeColor="@color/white"
            android:strokeLineJoin="round" />
            android:fillColor="@color/chart_color_1"
            android:pathData="M18,6 L21,12 H15 z"
            android:strokeWidth="0.5"
            android:strokeColor="@color/white"
            android:strokeLineJoin="bevel" />
    </group>
</vector>
效果图:

矢量图动画
只要胆子大,没有实现不了的矢量图,加上点动画效果那就更炫酷吊了。属性动画了解多少?好文链接==>: Android属性动画,看完这篇够用了吧
「矢量图动画步骤」
- 实现矢量图
- 实现属性动画
- 实现矢量属性动画粘合剂
- 布局引用,代码调用
轨迹动画
轨迹动画主要利用属性动画设置矢量图的
trimPathStart
或
trimPahtEnd
属性。要正确实现轨迹动画的前提条件:矢量图是一笔画出的,不能存在多次挪画笔的操作。
示例:
-
在drawable文件夹下创建
vector_text.xml文件:
<?xml version="1.0" encoding="utf-8"?>
<vector xmlns:android="http://schemas.android.com/apk/res/android"
    android:width="240dp"
    android:height="240dp"
    android:viewportWidth="24"
    android:viewportHeight="24">
        android:name="pathText"
        android:pathData="M9,6 L12,12 L15,6.5 18,12 21,6"
        android:strokeWidth="0.5"
        android:strokeColor="@color/white"
        android:strokeLineCap="round"
        android:strokeLineJoin="round" />
</vector>
画了一个白色的
W
:

2. 在
animator
文件夹下创建
animator_text.xml
文件。定义一个属性动画,操作矢量图的
trimPathEnd
属性。
<?xml version="1.0" encoding="utf-8"?>
    xmlns:android="http://schemas.android.com/apk/res/android">
    <objectAnimator
        android:duration="2000"
        android:propertyName="trimPathEnd"
        android:valueFrom="0"
        android:valueTo="1"
        android:repeatMode="reverse"
        android:repeatCount="infinite"
        android:valueType="floatType" />
    //这里顺便操作矢量图的画笔颜色
    <objectAnimator
        android:duration="2000"
        android:propertyName="strokeColor"
        android:valueFrom="@color/white"
        android:repeatMode="reverse"
        android:repeatCount="infinite"
        android:valueTo="@android:color/holo_blue_dark"
        android:valueType="colorType" />
-
在
drawable文件夹下创建animator_vector_text.xml文件,组合矢量图和属性动画,成为它两的粘合剂。由于兼容问题,需要在drawable-v21文件夹下创建。
<animated-vector xmlns:android="http://schemas.android.com/apk/res/android"
    android:drawable="@drawable/vector_text">
    <target
        android:name="pathText"
        android:animation="@animator/animator_text" />
</animated-vector>
animated-vector
标签的
drawable
属性值是第一步定义的矢量图文件名。
target
标签的
name
属性是我们在矢量图中定义的;而
animation
属性则是第二部定义的属性动画文件名。
-
在布局在引用
animator_vector_text文件
    <ImageView
        android:id="@+id/iv"
        app:srcCompat="@drawable/vector_animator_text"
        android:layout_width="match_parent"
        android:layout_height="wrap_content" />
- 在代码中开始动画:
    val animatable = iv.drawable as Animatable
    animatable.start()
「效果图:」

轨迹动画
轨迹动画是利用矢量图中相同的关键点进行变幻的过程。
Android 5.0前不支持轨迹动画。
示例:
-
在drawable文件夹下创建
vector_line.xml文件:
<?xml version="1.0" encoding="utf-8"?>
<vector xmlns:android="http://schemas.android.com/apk/res/android"
    android:width="240dp"
    android:height="240dp"
    android:viewportWidth="24"
    android:viewportHeight="24">
        android:name="pathLine"
        android:pathData="M9,6 L12,6 L15,6 18,6 21,6"
        android:strokeWidth="0.5"
        android:strokeColor="@color/white"
        android:strokeLineCap="round"
        android:strokeLineJoin="round" />
</vector>
我们定义了几个关键点,画了一条直线:

2. 在
animator
文件夹下创建
animator_morphing.xml
文件。定义一个属性动画,操作矢量图的
pathData
属性。
valueFrom
是第一步创建直线矢量图的属性
pathData
的值,
valueTo
是
W
矢量图的
pathData
的值。
<?xml version="1.0" encoding="utf-8"?>
<set xmlns:android="http://schemas.android.com/apk/res/android">
    <objectAnimator
        android:duration="2000"
        android:propertyName="pathData"
        android:valueFrom="M9,6 L12,6 L15,6 18,6 21,6"
        android:valueTo="M9,6 L12,12 L15,6.5 18,12 21,6"
        android:valueType="pathType" />
-
在
drawable文件夹下创建animator_vector_line.xml文件,组合矢量图和属性动画,成为它两的粘合剂。由于兼容问题,需要在drawable-v21文件夹下创建。
<?xml version="1.0" encoding="utf-8"?>
<animated-vector xmlns:android="http://schemas.android.com/apk/res/android"
    android:drawable="@drawable/vector_line">
    <target
        android:name="pathLine"
        android:animation="@animator/animator_morphing" />
</animated-vector>
-
在布局在引用
animator_vector_text文件
    <ImageView
        android:id="@+id/iv"
        app:srcCompat="@drawable/vector_animator_line"
        android:layout_width="match_parent"
        android:layout_height="wrap_content" />
- 在代码中开始动画效果:
    val animatable = iv.drawable as Animatable
    animatable.start()
「效果图」

到这里就结束了,下面是属于大家的小黄车~
大家的小黄车
实例demo演示,用了2小时给大家制作的小黄车,希望不要嫌弃:

- 在drawable文件夹下创建vertor_bicycle.xml文件夹,内容如下:
<?xml version="1.0" encoding="utf-8"?>
<vector xmlns:android="http://schemas.android.com/apk/res/android"
    android:width="300dp"
    android:height="300dp"
    android:viewportWidth="200"
    android:viewportHeight="200">
    <!--左车轮-->
    <group
        android:name="leftWheel"
        android:pivotX="40"
        android:pivotY="70">
            android:name="leftWheelAxle"
            android:pathData="M 40,70 L23,80M 40,70 L40,50 M 40,70 L57,80"
            android:strokeWidth="1"
            android:strokeColor="@color/white" />
            android:pathData="M 60,70 A 20,20,0,1,1,60,69 z"
            android:strokeWidth="1"
            android:strokeColor="@color/white" />
    </group>
    <!--右车轮-->
    <group
        android:name="rightWheel"
        android:pivotX="130"
        android:pivotY="70">
            android:name="rightWheelAxle"
            android:pathData="M 130,70 L113,80 M 130,70 L130,50 M 130,70 L147,80"
            android:strokeWidth="1"
            android:strokeColor="@color/white" />
            android:pathData="M 150,70 A 20,20,0,1,1,150,69 z"
            android:strokeWidth="1"
            android:strokeColor="@color/white" />
    </group>
    <!--车链盒子-->
        android:name="chainBox"
        android:fillColor="@color/colorPrimary"
        android:pathData="M 35,62 h54 v12 H35 z"
        android:strokeWidth="1"
        android:strokeColor="@color/white" />
    <!--车架-->
        android:pathData="M 50,69  L 65,40 L 80,69 M 86,65 L110,31
        v 20 L130,70  "
        android:strokeWidth="2"
        android:strokeColor="@color/colorPrimary"
        android:strokeLineJoin="round" />
    <!--前车轮挡板-->
        android:pathData="M105,73 A 20,20,0,1,1,125,85"
        android:strokeWidth="2"
        android:strokeColor="@color/colorPrimary"
        android:strokeLineJoin="round"
        android:trimPathEnd="0.4" />
    <!--车把-->
        android:pathData="M 110,31 V20 l -10,-4 h -3 M110,21  l -4,-10 h-3"
        android:strokeWidth="2"
        android:strokeColor="@color/white"
        android:strokeLineCap="round"
        android:strokeLineJoin="round" />
    <!--车篮-->
        android:fillColor="@color/white"
        android:pathData="M 111,41 h 21 v -12 H 111 z"
        android:strokeWidth="1"
        android:strokeColor="@color/white"
        android:strokeLineCap="square"
        android:strokeLineJoin="round" />
    <!--掘金LOGO-->
        android:fillColor="@color/colorPrimary"
        android:pathData="M 121,30 L122,31 L121,32 L120,31 z"
        android:strokeWidth="0.5"
        android:strokeColor="@color/colorPrimary"
        android:strokeLineCap="square"
        android:strokeLineJoin="miter" />
        android:pathData=" M119,33 L121,35,L123,33
          M118,34 L121,37,L124,34"
        android:strokeWidth="0.5"
        android:strokeColor="@color/colorPrimary"
        android:strokeLineCap="square"
        android:strokeLineJoin="miter" />
    <!--皮座-->
        android:fillColor="@color/white"
        android:pathData="M 55,40 h 20 v-4 H56 v-3h-2"
        android:strokeWidth="1"
        android:strokeColor="@color/white"
        android:strokeLineCap="square"
        android:strokeLineJoin="round" />
    <!--脚踏板-->
    <group
        android:name="pedal"
        android:pivotX="82"
        android:pivotY="68">
            android:pathData="M 82,68  L 98,80"
            android:strokeWidth="0.5"
            android:strokeColor="@color/white"
            android:strokeLineCap="round" />
            android:fillColor="@color/white"
            android:pathData="M 96,80 A 2,2,0,1,1,96,81 z"
            android:strokeWidth="1"
            android:strokeColor="@color/white" />
    </group>
</vector>
「预览图:」


2. 在
animator
文件夹下创建
animator_wheel.xml
文件,实现车轮和脚踏旋转属性动画:
<?xml version="1.0" encoding="utf-8"?>
<set xmlns:android="http://schemas.android.com/apk/res/android">
    <objectAnimator
        android:interpolator="@android:interpolator/linear"
        android:propertyName="rotation"
        android:repeatCount="infinite"
        android:valueType="floatType"
        android:valueFrom="0f"
        android:valueTo="360f"
        android:repeatMode="restart"
        android:duration="2000"/>
        //可以再增加其他动画效果,例如颜色变化
-
在
animator文件夹下创建animator_bicycle_left_to_right.xml布局文件,实现单车从左到右移动属性动画:
<objectAnimator xmlns:android="http://schemas.android.com/apk/res/android"
    android:propertyName="translationX"
    android:valueFrom="-600f"
    android:valueTo="900f"
    android:valueType="floatType"
    android:repeatCount="infinite"
    android:repeatMode="restart"
    android:duration="9000"
    android:interpolator="@android:interpolator/linear"
-
在
drawable文件夹下创建verctor_animator_bicycle.xml文件,实现单车矢量图和属性动画的粘合剂,也就是最终的矢量图动画。由于兼容问题,需要在drawable-v21文件夹下创建。
<?xml version="1.0" encoding="utf-8"?>
<animated-vector xmlns:android="http://schemas.android.com/apk/res/android"
    android:drawable="@drawable/vertor_bicycle">
    <target
        android:animation="@animator/animator_wheel"
        android:name="leftWheel"/>
    <target
        android:animation="@animator/animator_wheel"
        android:name="rightWheel"/>
    <target
    android:animation="@animator/animator_wheel"
    android:name="pedal"/>
</animated-vector>
-
在布局中引用
verctor_animator_bicycle.xml文件,
<?xml version="1.0" encoding="utf-8"?>
<RelativeLayout xmlns:android="http://schemas.android.com/apk/res/android"
    android:layout_width="match_parent"
    android:layout_height="match_parent"
    xmlns:app="http://schemas.android.com/apk/res-auto"
    android:background="@color/black">
    <ImageView
        android:id="@+id/iv"
        app:srcCompat="@drawable/verctor_animator_bicycle"
        android:layout_width="match_parent"
        android:layout_height="wrap_content" />
    <TextView
        android:id="@+id/btnStart"
        android:layout_width="wrap_content"
        android:layout_height="wrap_content"
        android:layout_alignParentBottom="true"
        android:layout_centerHorizontal="true"
        android:layout_marginBottom="50dp"
        android:background="@color/white"
        android:padding="10dp"
        android:text="开始"
        android:textColor="@color/colorPrimary"
        android:textSize="16sp" />
</RelativeLayout>
-
在
AppCompatActivity中代码调用:
    btnStart.setOnClickListener {
        val animatable = iv.drawable as Animatable
        animatable.start()
此时效果图:

7. 加上从左到有的属性动画:
    btnStart.setOnClickListener {
        val animatable = iv.drawable as Animatable
        animatable.start()